Picking Your Size in Handmade Garments
A guide on how to choose which size to make from any crochet or knitting pattern

Have you ever wondered why some sweaters you make fit incredibly, while others leave something to be desired in terms of fit? Well, sometimes this has less to do with your yarn or your gauge, and everything to do with the size you picked from the pattern sizing chart.
Whether you’re about to start your very first sweater, or you’re a seasoned garment maker, the most important thing you should be asking yourself before diving into making your next sweater is: How do I know what size to make?
Some patterns provide a detailed sizing breakdown with guidance on ease and customization options, while others simply include a chart of finished measurements and leave the rest up to you. Regardless how detailed their sizing charts, most crochet and knitting patterns follow the trusted standards set by the Craft Yarn Council (CYC). If you’ve ever felt lost trying to figure out what “medium” really means in crochet terms, the CYC has your back. They’ve put together easy-to-read charts covering everything from body measurements to hook sizes and common terminology. Their women’s sizing chart, for instance, is a handy way to see exactly where your own measurements fit into the standard sizes most crochet patterns use.
But just looking at the CYC charts and determining you are a “medium” isn’t going to ensure that every sweater pattern you’ll ever make will fit you properly as long as you pick this size. To make sure that the clothes you’re making will actually fit, you need to know two things: your actual body measurements, and the intended ease. You’ll use this information to pick the corresponding size.
All my independently published patterns, as well as the patterns from my book, Reversible Crochet Sweaters, include a sizing chart and schematic to help you decide which size to make.
This post may contain affiliate links that support the content on CrochetHighway.com. All opinions are my own.
Measuring your own body
At minimum, most crochet sweater patterns require your bust, upper arm, and wrist measurements. Longer or more shaped garments may also call for waist and hip measurements.
For accurate measurements, use a flexible tape measure and keep it snug (but not tight) against your body. Always measure over the undergarments you’ll wear with the sweater (e.g., bra, tank top).
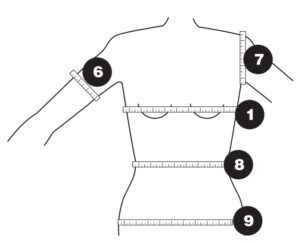
- Bust: measure around the fullest part of your chest (1)
- Upper arm: measure around the widest part of your bicep (6)
- Wrist: measure around the wrist at the bone
- Waist: measure around the narrowest point (often near the navel) (8)
- Hips: measure around the hips at the hipbone for a regular-length sweater (between 8 and 9), or around the widest point of your bum for a tunic-length sweater or sweaterdress (9)
Understanding ease
“Ease” is the difference between your body measurement and the finished garment measurement.
For example, if you have a 40-inch (102-cm) bust, and the pattern states that the sweater is to be worn with 2 to 6 inches (5 to 15 cm) of positive ease around the bust, then the size you should be making will have a finished bust circumference that falls anywhere within the 42 to 46-inch (107 to 117-cm) range.
Let’s say that in the pattern you’re making, this size happens to be a 44-inch (112-cm) finished bust. This means the garment will measure 4 inches (10 cm) larger than your actual bust circumference, which checks out because it is within the recommended ease range of 2 to 6 inches (5 to 15 cm).
Similarly, a garment can have negative ease. Negative ease indicates a tighter fit—meaning the garment is slightly smaller than your bust, which works for very form-fitting styles.
And in between positive and negative ease we have neutral ease, also called “zero ease”. This is when the finished measurement of the garment is exactly the same as your actual body measurement, which makes the difference between the two equal zero.
Remember that body shapes vary even within the same size bracket, but making your own garment gives you the freedom to tailor it uniquely to your proportions. For a superior fit, many of my sweater patterns include customization tips for making adjustments at key points throughout the sweater making process.
Sleeve fit at the upper arm
For most patterns, you’re selecting your size primarily based on the finished bust circumference. Sometimes, the sleeve that comes paired with that bust won’t fit you perfectly, and that’s okay. The sleeve written in the pattern can be too large or too small. For a comfortable fit, I recommend a sleeve ease of approximately 2 inches (5 cm) around your upper arm.
For patterns that feature seamed sleeves, don’t feel locked into the sleeve size that matches the rest of your sweater. If another size’s measurements are closer to your arm dimensions, you can simply follow the instructions for that sleeve instead. Mixing and matching like this can be a great way to get a sleeve fit that feels just right for you.
For garments featuring seamless sleeves, such as a circular yoked sweater worked from the top down, you can pick up fewer or more stitches in the underarm area (typically called the underarm chain) to quickly adjust the upper arm circumference before starting your sleeve. This is called an afterthought sleeve adjustment. You can also alter the upper arm circumference from the start by adding/omitting increases to/from the sleeve panels on the yoke.
Sweater lengths
While ease is one of the most important concepts to understand when talking about circumferences (horizontal measurements), on the other side of the coin there are the lengths (vertical measurements). To make a well-fitting garment, you also need to consider the vertical measurements. These are the yoke depth, the body length from underarm (which together form the overall sweater length), and the sleeve length.
Yoke depth
When checking the yoke depth while making your sweater, a good rule of thumb for a fitted garment is that it should fall approximately 1 inch (2-3 cm) below your armpit. Anything bigger than that and the fit will lean toward oversized; anything smaller and the fit will be too tight and uncomfortable. When checking the fit, remember that if the yoke feels like it might be too tight, then it’s probably going to be just right. The body and sleeve weight will weigh everything down, making the arm hole bigger after blocking and during wear.
Pro tip! Compare the yoke depth to a garment that you know fits well at the underarm and use that as a guide.
Body length from underarm
In episode 13 of Knit Talk by The Unapologetic Knitter (go and listen to the whole episode, it’s very insightful!) we learn the following guidelines when it comes to sweater lengths:
- Full length sweater: 11 to 12 inches (28 to 30 cm) from underarm to hem, approximately 1 inch (2 to 3 cm) below your hip bone or approximately at the top of pockets on a pair of jeans
- Cropped sweater: 8 to 9 inches (20 to 23 cm) from underarm to hem, or approximately at your belly button
- Semi-cropped sweater: 10 inches (25 cm) from underarm to hem, or approximately at the top of a mid rise waist band
- Tunic length/sweater dress: over 14 inches (35 cm) from underarm to hem
Bonus tip: Waist/hip shaping on a full length sweater
Waist shaping is not only for form fitting, negative ease sweaters! A gentle waist shaping can make even baggy, oversized sweaters have a more polished look and generally look nicer.
For a comfortable fit, make as many waist decrease rounds as needed so that the waist of the sweater fits you with at least 2 inches (5 cm) of positive ease at the waist. Make as many hip increase rounds as needed so that the last round of the sweater fits around your hips with about the same amount of ease as the bust.
An example on how to decrease and increase for waist shaping, taking the vertical measurements as a reference:
- Start decreasing at approximately 2 inches (5 cm) below the sweater underarm
- Stop decreasing and start increasing at the natural waist
- Stop increasing at the hip bone
Sleeve length
For a full-length sleeve, the total length I recommend (including any cuff details, such as a ribbed cuff is approximately 1 inch (2.5 cm) below your wrist bone.
Pro tip! Finish the main pattern on both sleeves and only then add the ribbed cuff. This is because the sweater will not sit symmetrically on your body with only one sleeve attached. At this point, it would be more difficult to make the right decision on how long the ribbed cuff should be, and you may end up with an overall sleeve length that is shorter than what you expected.
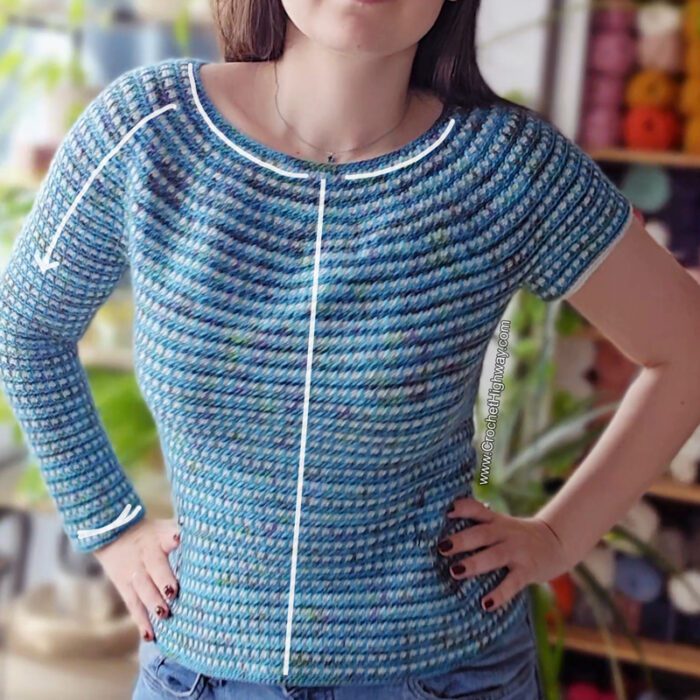
In the next photo I’m doing a fit check of my second Libra Pullover right after completing the body of the sweater and the right sleeve.
Do you see how the sweater is dragged downwards by gravity more on the right side? That’s because the weight of the right sleeve is dragging everything down with it, and there’s nothing to balance it out on the left side. The asymmetry is most obvious in the neckline. Once I attached the left sleeve, the right cuff ended up sitting a little bit higher up on my arm.
Sleeve tapering
When making tapered sleeves, remember that the sleeve circumference should match your actual arm circumference (plus ease) all across the sleeve length, not just at the top (upper arm) and bottom (cuff) of the sleeve!
For best results, I recommend no more than 1 inch (2.5 cm) of ease at the cuff and approximately 2 inches (5 cm) of ease around your upper arm. Add or omit decrease rounds accordingly!
Reduce the sleeve length by working fewer rounds and also redistributing the appropriate number of decrease rounds so that the final cuff circumference sits approximately 1 inch (2.5 cm) above your wrist.
Pro tip! Often try the sweater on as you work in order to determine if the sleeve circumference is right for you.
Bonus tips
Don’t rely on past measurements
Measure yourself before starting any new sweater. Don’t rely on the numbers from back when you made your last sweater, because your body measurements can change over time!
Take a look inside your wardrobe
If you have a favorite sweater that fits well, lay it flat, measure it, and compare that to the pattern. This can help you choose your preferred ease and fit.
The bust and sleeves are not the only things that need to fit well
While the bust and sleeves are critical measurements, truly fitted garments often require more data. Neck width, armhole depth, back length, shoulder width, bust height, hip and waist circumference are examples of areas that can markedly affect the sweater’s comfort and silhouette, so you should pay attention to them as well.
Make sure you’re on gauge
Most pattern makers (myself included) can only guarantee that the pattern will yield a well-fitting garment if and only if you’re working at the same gauge the pattern calls for. If you veer off of that, things like fit, drape, and yardage start to get unpredictable.
Always make a swatch, then wash and block it using the same method you’ll use on your finished garment, and measure again. Yarn, especially natural or textured fiber like cotton or bamboo, can alter gauge dramatically when washed. A larger swatch (a square measuring at least 6 inches or 15 cm across) will give you more reliable data than a tiny one. Read more about gauge swatching and how to adjust your gauge in my comprehensive gauge swatching guide (coming soon!).
Ease variations
The Craft Yarn Council offers a Bust/Chest Fit and Ease Chart. This chart should be interpreted as a guideline, not a rule. It recommends the amount of ease to add or subtract to bust/chest measurements if you prefer a close-fitting garment, an oversized garment, or something in-between.:
- Very close/negative ease: up to 4″ (10 cm) less than your bust
- Zero ease: same as your body
- Classic fit (positive ease): 2–4″ (5–10 cm) larger
- Loose/relaxed fit: 4–6″ (10–15 cm) larger
- Oversized: more than 6″ (15 cm) larger
Final thoughts
Creating a well-fitting crochet sweater shouldn’t be guesswork, but a combination of precise measurement, swatching, understanding ease, blocking according to fiber, and thoughtful adjustments. By layering these steps you’ll craft a sweater that fits YOUR body perfectly.
Happy crocheting, and may your next sweater feel like it was made just for you (because it really was)!
Thirsty for more? Why not check out some of my recently published crochet patterns and stitch tutorials: