How to Gauge Swatch
All your questions about how to crochet a gauge swatch, answered!
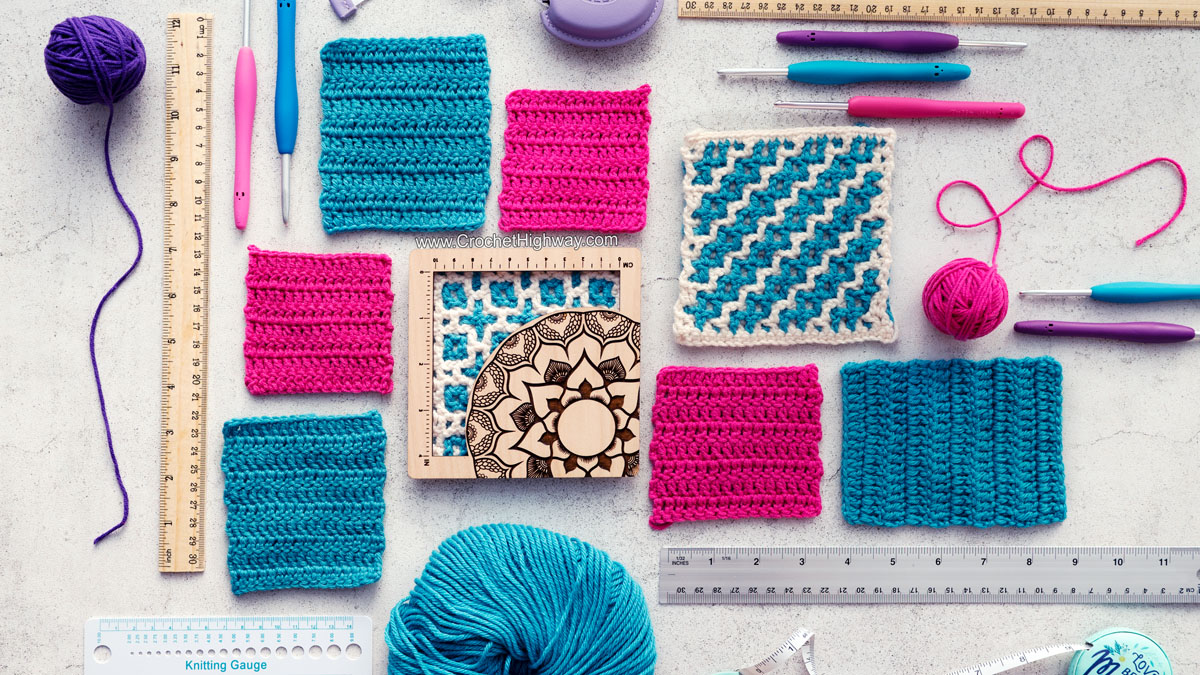
I know that few steps on your journey as a fiber artist feel as tempting to skip as gauge swatching. But take it from me, it’s the secret ingredient to making garments and wearables you’ll truly love (and actually wear). That little square of stitches might look humble, but it’s your crystal ball: it reveals how your chosen yarn behaves, how your colors look like next to each other, and ultimately whether your dreamy sweater ends up runway-ready or relegated to the lesson learned pile.
Whether you’re crocheting something for yourself following a pattern, designing your own piece, or taking part in a pattern test and some designers make it a requirement that you meet gauge in their tests (it’s me, I’m some designers haha!), knowing which crochet hooks to use and how to manipulate your stitches is a valuable tool that will come in handy again and again in your crochet journey.
Every seasoned crocheter has a story (or three) about a sweater that turned out less couture and more couch cover because gauge was ignored or misunderstood. And yes, even with the best intentions, swatches can sometimes play tricks on you. They don’t always tell the whole truth about how your fabric will act once it grows into a full garment. But here’s the good news: with the right approach, your swatches will speak more truthfully and will dramatically improve your chances of success.
So before you dive headfirst into that gorgeous new pattern, take a pause. Grab your yarn, several different hooks, and a pinch of patience. I hope that by the end of this article, you’ll no longer view swatching as a roadblock, but more like your shortcut to great and consistent results.
Table of Contents
I recommend you give this whole article a good read-through, but I also put together this table of contents for you so you can quickly jump directly to the topic you’re most interested in!
This post may contain affiliate links that support the content on CrochetHighway.com. All opinions are my own.
1. What is gauge and why does it matter?
Gauge is stitches (and rows) per inch. That’s it, and nothing more! Easy, right?
To elaborate a little bit while still keeping it short and sweet, gauge is a measure of stitch and row count per unit of length. In other words, the number of stitches and rows that fit inside a pre-determined space. You can use one inch (2.54 cm) as your measure or, as most crochet and knitting patterns are phrased, you can go by the number of stitches and rows that fit inside a 4 x 4-inch (10.16 x 10.16-cm) square.
If your sweater was a screen monitor and your stitches were the pixels, then gauge would be the pixel size.
If your sweater was a sheet of graph paper and your stitches were the squares forming the grid, then gauge would be the size of the square.
You get the idea.
You might be tempted to brush off a seemingly small gauge difference of just 2 or 3 stitches. But let me show you very quickly why that’s actually a big deal. For this example, I’ll only look at the stitch gauge.
Let’s say you’re making a sweater in size 4, which is around the middle of the size range in a pattern graded for 9 sizes.
Let’s assume that the finished bust circumference of this sweater in size 4 is 44 inches (112 cm), and let’s also assume the pattern is drafted for a gauge of 20 stitches per 4 inches (10.16 cm).
A quick calculation using these hypothetical datapoints reveals that there are 220 stitches needed at the bust: 20 stitches × 44 inches ÷ 4 inches = 220 stitches.
If you made a gauge swatch and your actual gauge came out to be 18 stitches per 4 inches (10.16 cm), then the finished bust circumference of your own sweater is actually going to be almost 49 inches (124 cm): 220 stitches × 4 inches ÷ 18 stitches = 49 inches.
That’s a full 5 inches (13 cm) larger than the sweater you set out to create. If the difference from size to size in this hypothetical pattern is 4 inches (10.16 cm) like it often is, then making a so-called size 4 at this gauge is actually going to produce a sweater that is even bigger than size 5, the next size over. Who knows how that will fit (especially paired with some arbitrary row gauge)? In such a scenario, you’ll also almost always run out of yarn, too. So, why not take the time to experiment a little with your yarn and hook sizes before diving in?
2. What is a gauge swatch?
A gauge swatch is freedom and relief.
It is a strategic use of your time, energy, and materials.
It’s like dipping your toe in the water before diving in headfirst.
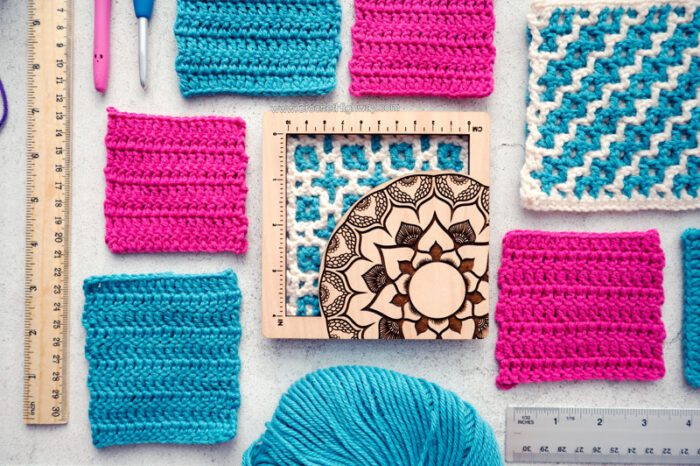
More concretely, a gauge swatch, sometimes called a test swatch or a test square, is a piece of fabric oftentimes in the form of a square or a rectangle that acts as a sample of the same fabric used in your finished piece. This sample allows you to assess things about it such as how thick the fabric is, how it drapes, how it behaves during and after blocking, how the colors work together, and, importantly, what your gauge is when using the hook size recommended by the pattern.
The gauge swatching process allows you to make all these assessments before committing to a huge, time-consuming project, and alerts you ahead of time if you need to make any adjustments before you begin. Simply crochet a gauge swatch, block it, and measure your gauge. This way you can quickly determine that your gauge is off in one way or another, or decide that you dislike the drape or how the colors work together. It’s easier and quicker to do this once or even multiple times, then it is to have crocheted an entire sweater only to block it and realize it grew tremendously, the fabric is too stiff, or the colors bled and mixed together!
3. Should I crochet my gauge swatch flat or in the round?
Because the gauge swatch is literally a replica of the actual fabric used in your project, it naturally follows that it should closely mimic everything about the project, including the way the stitches are facing from one row to the next. Gauge will change depending on whether or not you’re turning after each row or not, even if you’re using the same stitch pattern. Crazy, right?
If the project you’re swatching for is worked flat, for example if it’s constructed out of individual panels seamed together, then your gauge swatch should also be worked flat, in turned rows.
If the project is worked in the round on the right side only, then your gauge swatch should follow suit, and come in the form of a small tube worked on the right side only.
Most of my patterns worked in the round on the right side only instruct you to create a tube shape for your gauge swatch. This way, you not only get to see how the pattern works up in the round, but you also get to see what the seam (or join) will look like on the back of your work, and practice special techniques such as the invisible join. You may also mimic this construction by cutting the yarn at the end of each row and reattaching it at the beginning of the next row, to keep working on the right side only without crocheting all sides of the tube.
4. How large should a gauge swatch be and why does it matter?
Most crochet and knitting patterns refer to a gauge over 4×4 inches (10.16 x 10.16 cm). One reason for this is that 4 inches (10.16 cm) is the smallest increment that the Craft Yarn Council uses between bust sizes in their Standard Body Measurements charts, and therefore this is the step that designers use to grade their patterns that are based off of the 9 CYC sizes.
However, this doesn’t mean you should crochet a gauge swatch that measures 4×4 inches (10.16 x 10.16 cm), no, no, no! For an accurate gauge measurement, you need to crochet a swatch that is a bit larger than that. I typically aim for approximately 6×6 inches (15.25 x 15.24 cm) as the sweet spot for a generously sized gauge swatch. This will ensure that the measurement won’t be distorted by the stitches and rows around the edges of your swatch. A swatch of this size also allows for a better evaluation of how the fabric will behave: think about the drape and weight of your blocked garment fabric.
Most of my patterns come with detailed gauge swatching instructions, so you don’t have to do any math before you start your gauge swatch. But if there are no gauge swatching instructions and the pattern simply gives you the gauge information in the form of “16 stitches and 20 rows per 4 inches (10 cm)”, then use this suggested gauge measurement to calculate the total number of stitches you need to start with so that you can crochet a piece of fabric that is at least 6 inches (15.24 cm) across. In this example, you’d need to start with 24 stitches (16 stitches times 6 inches divided by 4 inches) and crochet no fewer than 30 rows (20 rows times 6 inches divided by 4 inches) in order to achieve a 6×6 inches (15.25 x 15.24 cm) swatch. If you need to crochet a tube, then double the number of stitches.
Hold off on checking your gauge until your swatch is fully finished and blocked. I promise you’ll get the most accurate results that way! Measuring too early can give misleading numbers, and there’s no need to worry about wasting yarn. If you’re working with limited yardage, you can always unravel your swatch later and reuse the yarn to complete your project.
5. Should I block my swatch?
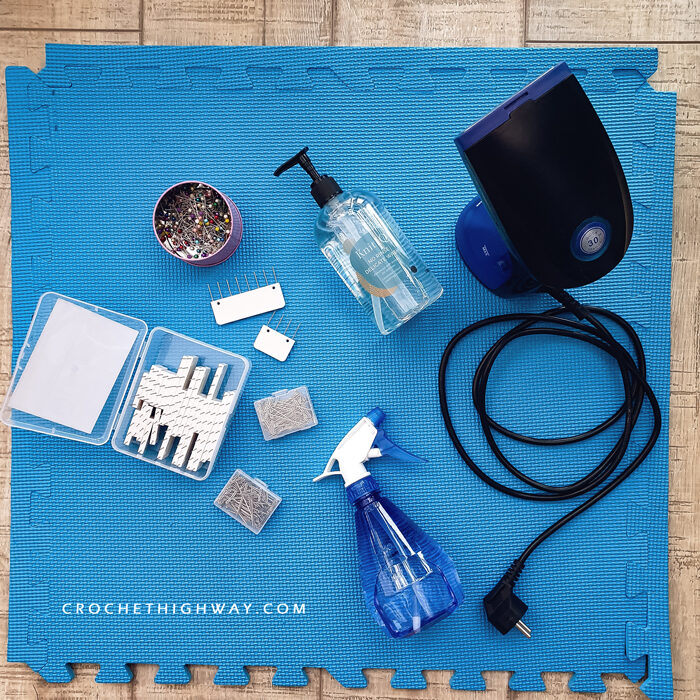
If you’ve ever wondered whether blocking your gauge swatch is worth the extra effort, 9 times out of 10 the answer is yes. Think of blocking as the final polish that helps your swatch reveal its true nature. Unless you’re making a project that will never see water, steam, or soap (a rarity!), blocking is essential, especially for garments where fit is important.
The golden rule is to treat your swatch exactly the way you’ll treat your finished piece. If you’re planning to steam block your sweater, then you should also steam block the swatch. If you’re going to wet block your sweater (which, in my personal opinion, is something you should rather do), then you should absolutely give your little square the full spa treatment! You can pin the edges for crisp, straight lines, which makes measuring much easier and far more accurate. Just resist the urge to stretch your swatch out of shape. What you want at this stage is its natural, relaxed gauge, not an overly stretched fabric.
Learn more about blocking in my comprehensive guide.
Pro tip! Blocking is extra important when it comes to colorwork, or whenever you’re using multiple colors in the same project. I like to include every shade in my swatch, then block it to see how the yarns and colors behave together. This not only reveals the fabric’s drape and stitch definition but also lets me check for pesky color bleeding so I don’t get a jumpscare after pouring hours of work into crocheting and blocking my sweater.
If wet blocking, you should always wait for your swatch to fully dry before taking the measurements. Even if you’re steam blocking (which is also a way of adding water to your fabric), it’s best practice to allow your swatch to rest for a few hours to a day before measuring. Some yarns, especially springy or bouncy ones, like to “settle” back a bit after drying. Measuring too soon can give you false readings, while waiting ensures your fabric is showing you its truest self.
And what about fibers that like to grow over time, like silky, drapey yarns with little natural elasticity (I’m looking at you, bamboo!)? That’s where gravity testing comes in. Hang your swatch up and, if you’re extra cautious, clip a few light weights to the bottom. This helps mimic the way an entire garment will stretch under its own weight, giving you a much better sense of the fabric’s long-term behavior.
In short: blocking isn’t busywork. It’s your chance to see how your yarn will behave in real life, not just in theory. So, pamper that little square of stitches and your future sweater (and your future self) will thank you!
6. How do I actually measure my gauge?
First of all, if you used blocking pins in the previous step, remove them and lay the swatch flat on a smooth surface. It’s best practice to never use anything to hold the swatch in place (such as pins or your fingers) when taking the measurement.
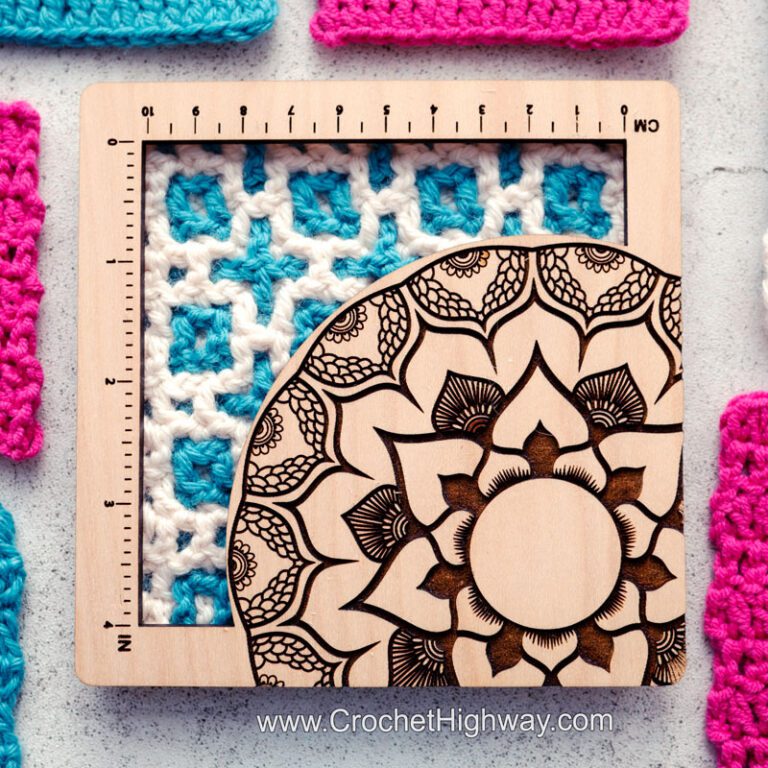
Pro tip! I always recommend using a rigid ruler (think metal, wooden, or plastic), instead of a flexible measuring tape. If you want to be fancy, you can use one of these nifty little gauge measuring squares, but just about any rigid ruler you have lying around the house will work perfectly fine!
While flexible measuring tapes are great to measure your own body in order to pick the correct sweater size, I avoid them because they often stretch over time and give less accurate readings than a rigid ruler.
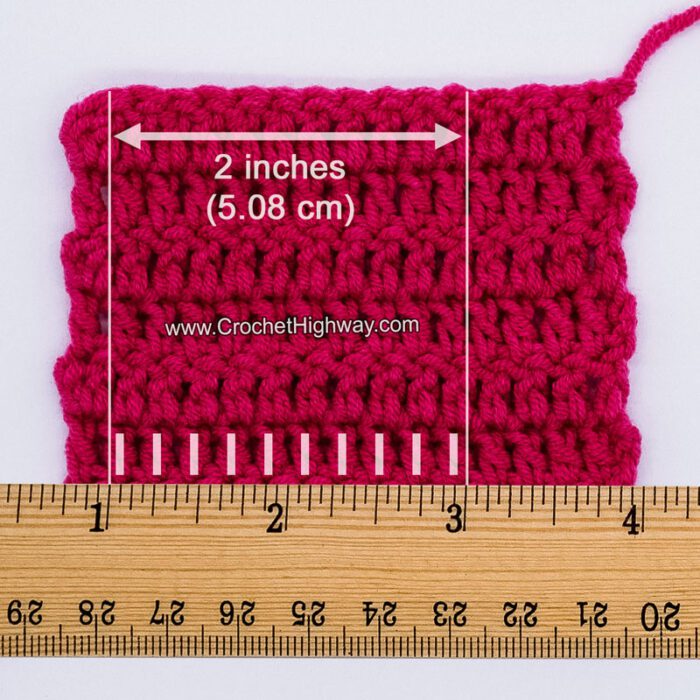
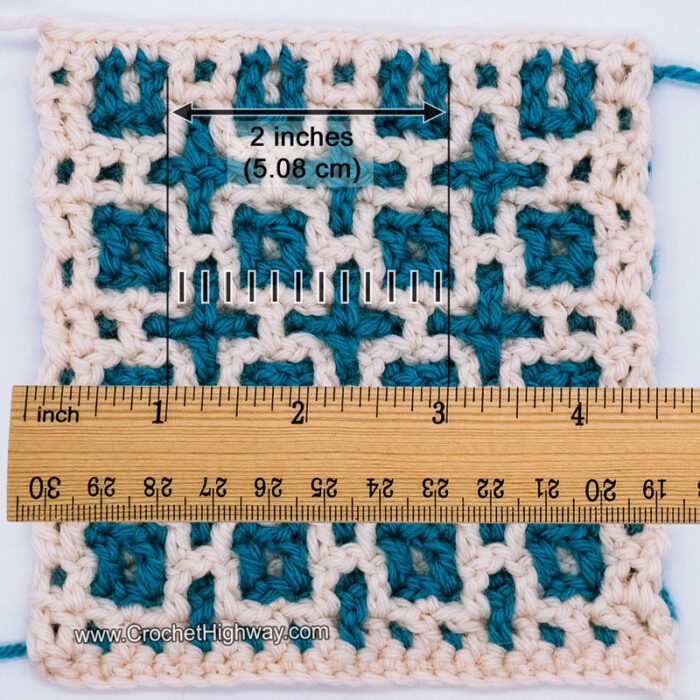
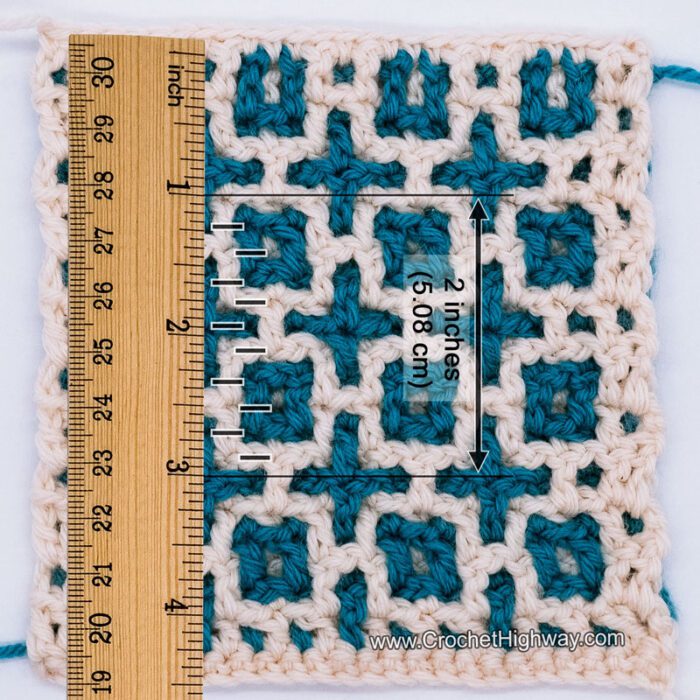
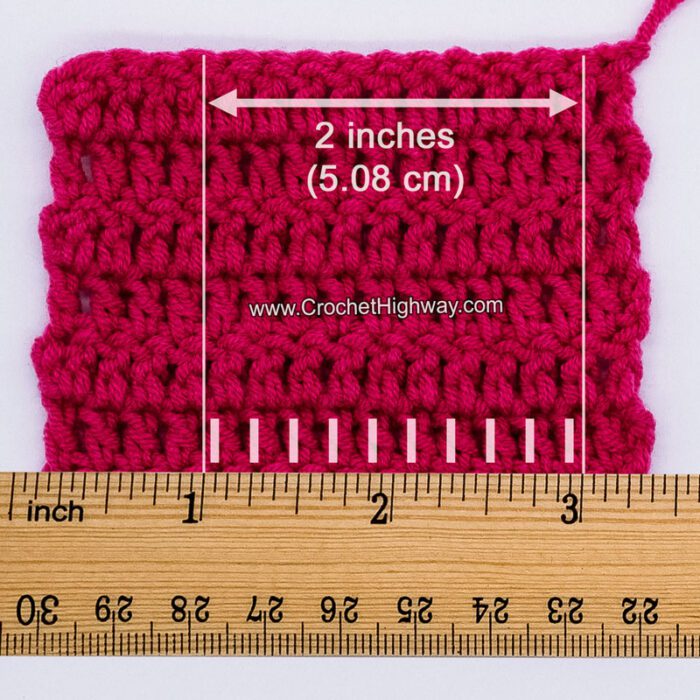
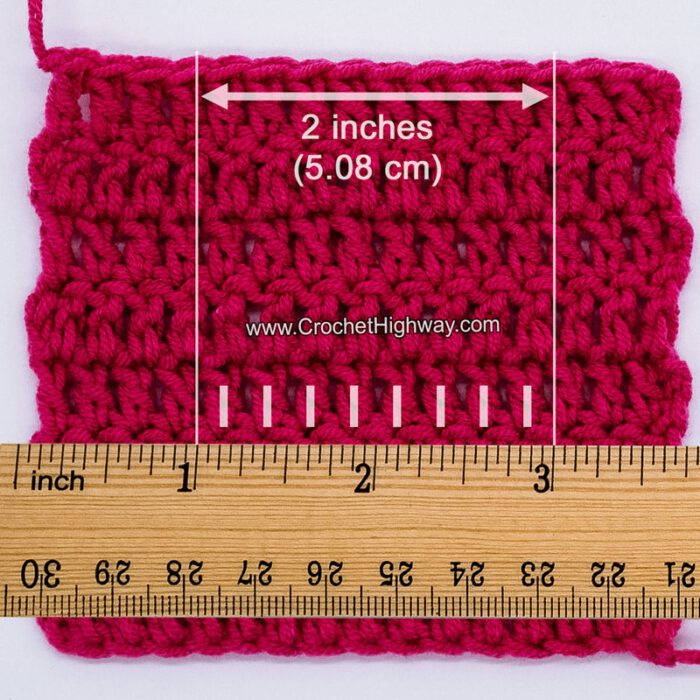
Below I’m showing you 2 examples: a gauge swatch worked in plain double crochet, and a gauge swatch worked in interlocking crochet. For the purposes of this demonstration, both swatches are measured across 2 inches (5.08 cm).
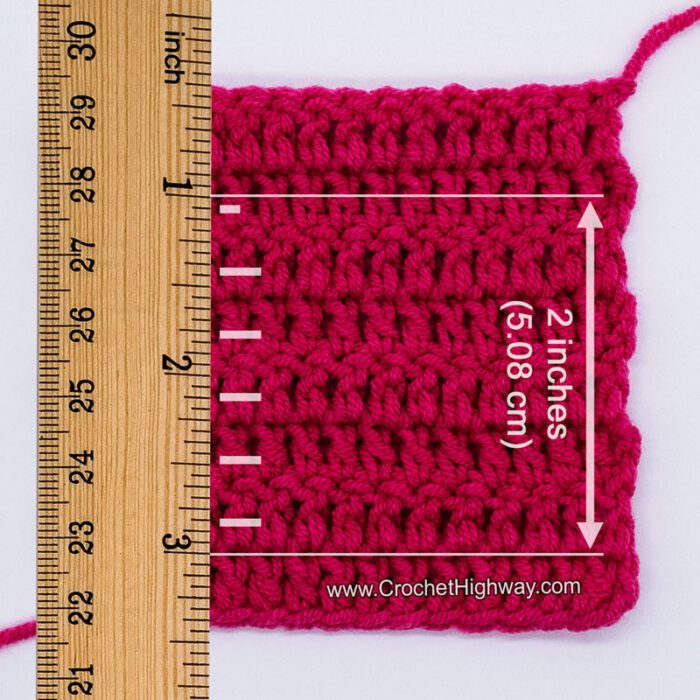
Measuring your gauge is nothing more than using the ruler to count the number of stitches across the center of the fabric, excluding the stitches around the edges from your measurement. To check your row gauge, turn your ruler 90 degrees and line it up with the top of a stitch at the center of your swatch. Then, count how many rows fit within the same distance, again excluding the rows around the edges.
Swatch worked in plain double crochet: 10 stitches and 5.5 rows per 2 inches (5.08 cm), which means a gauge of 20 stitches and 11 rows per 4 inches (10.16 cm).
Swatch worked in interlocking crochet: 12 stitches and 10 rows per 2 inches (5.08 cm), which means a gauge of 24 stitches and 20 rows per 4 inches (10.16 cm). Remember that in interlocking crochet, the chain space between 2 double crochets counts as 1 stitch. In terms of counting the rows, you simply follow along the anatomy of the double crochet stitch (see the highlighted examples below). Each double crochet stitch counted vertically counts as 1 row.
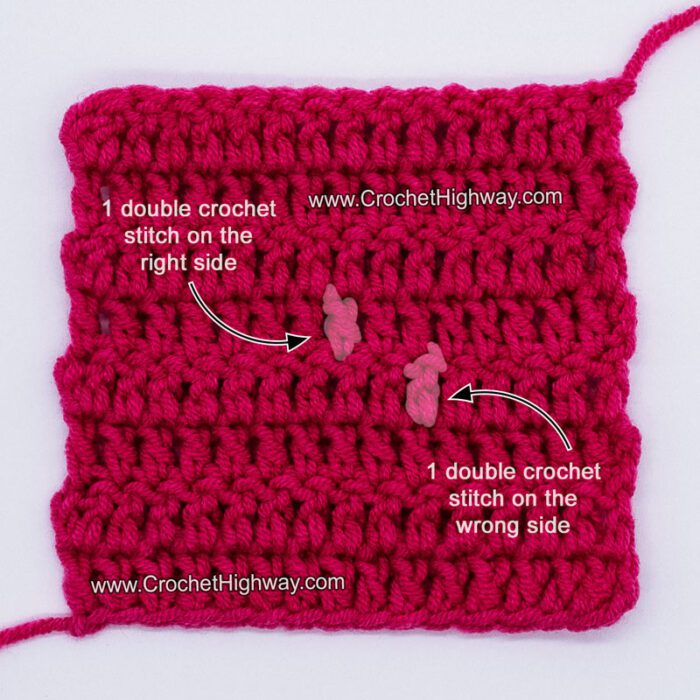
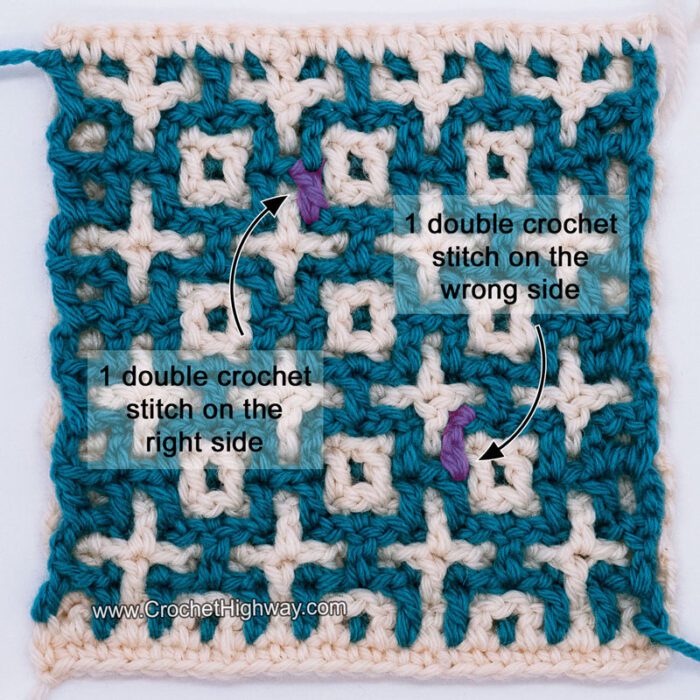
The same principle of measuring your gauge applies to both traditional crochet and interlocking crochet, and it has much to do with knowing the anatomy of your crochet stitches. In other words, you need to learn to single out a specific stitch from the fabric, to look at it and understand where that one stitch starts and ends, which loops make it up and which loops make up the stitches around it. You’ll develop this skill with time, by making and measuring countless gauge swatches! The unapologetic nature of our slow craft means that there’s no sexy shortcut to learning this, but I can show you a visual of what I’m referring to.
In the next two photos I highlighted one single double crochet stitch from the rest. This is what I mean by “singling it out”. Once you learn to interpret your stitches like this, you’ll instantly know how to count them–in any stitch pattern, even interlocking.
Once you measured your gauge, you now have 2 scenarios: either your measured gauge matches the pattern gauge, or it doesn’t.
If your blocked gauge is the same as the one written in the pattern, you’re ready to dive into the project! Write down the hook size you used to meet gauge, so you don’t forget it if you need to set your project aside for a bit.
If your blocked gauge is different than the one written in the pattern, check the How Do I Adjust My Gauge? section below and remake your gauge swatch accordingly. Remember to always block each swatch and measure it after it has dried.
7. Why don’t I get the same gauge as the pattern, even though I’m using the exact same yarn and hook size?
You spend time and energy sourcing the same exact yarn the designer used, you even use the same exact hook size suggested in the pattern… and your gauge is still off, either widthwise (you have fewer or more stitches per inch), lengthwise (you have fewer or more rows per inch), or both. I go into greater detail on how to adjust your gauge for both scenarios in the following section. The main takeaway is that stitch gauge is adjusted by changing your hook sizes, and row gauge is adjusted by changing the golden loop.
8. How do I adjust my gauge?
First thing’s first! The methods I’m about to present next are intended for situations where you want to match the pattern gauge exactly, like when you’re crocheting something as part of a pattern test and gauge is extremely relevant, or when you don’t want to or don’t know how to modify the pattern math to make it work for a different gauge. It’s not wrong to not want to try a bunch of different hook sizes or adjust your golden loop to something that feels uncomfortable for you! But if you’re going to work the pattern at a different gauge, it’s always great to be aware of it, so you’re prepared to face the consequences so you know what to expect and not be surprised if your work turns out differently 😁
Let’s take the previous example and assume the gauge listed in the pattern is 16 double crochet stitches and 20 rows per 4 inches (10.16 cm). Let’s also assume that the recommended hook size listed in the pattern is a US G-6/4.0 mm hook.
Note: We’re using double crochet stitches in the following examples, but the same exact principles apply to any crochet stitch pattern.
a. Adjusting your gauge widthwise: changing hook sizes
As you crochet, you have your very own natural tension that you apply to the stitches. Your very own set of movements that you do consciously or subconsciously, which makes each piece you crochet unique to you!
Crochet hooks are mere tools that come in various sizes, calibers, and materials in order to help you (and your natural tension) achieve your desired results. Assuming that your natural tension stays the same, then the smaller the hook size, the smaller your stitches will be, and therefore the smaller your gauge and the more of them will fit across 4 inches (10.16 cm).
In short, your natural tension paired with the hook size you are using will result in a given gauge (stitches per inch). Your job is to match the specific gauge that is given in the pattern. Sometimes, this combo yields a gauge that is either smaller, or bigger than the pattern gauge. And since you can’t easily change your natural tension (and why should you?), then obviously what needs to change is the hook size!
The width of your stitches can be almost instantly adjusted by switching to a different hook size. Here’s an example of the same stitch pattern worked using the same yarn and with the same stitch count. The only difference is the hook size used. A US D-3/3.25 mm hook yields a stitch gauge of 10 double crochets per 2 inches (5.08 cm) or 20 double crochets per 4 inches (10.16 cm), while a US G-6/4.0 mm hook size yields a considerably larger stitch gauge of 8 stitches per 2 inches (5.08 cm) or 16 double crochets per 4 inches (10.16 cm).
Remember, the hook size suggested in the pattern is only a recommendation, a starting point if you will. It’s the hook size that the designer or pattern maker used themselves to achieve the pattern gauge. It’s not a guarantee you’ll also achieve the same gauge using the same hook size. The hook size written on the label of your yarn ball is also merely a suggestion and not a hard-and-fast rule!
In conclusion:
If your gauge is smaller widthwise, go up in hook size.
For example, if you used a US G-6/4.0 mm hook and your gauge came out to be 20 stitches (instead of 16), that means that your stitches are too narrow. The 4-inch (10.16-cm) space that the pattern assumed will be occupied by 16 stitches will actually fit 20 of your stitches. Conversely, 16 of your stitches occupy less space than needed. In this case, the solution is to go up to a US 7/4.5 mm or US H-8/5.0 mm hook.
There’s no easy formula to instantly determine which hook size will help you achieve the pattern gauge. You must find it by trial and error. The bigger the difference between the pattern gauge and your actual gauge, the bigger the gap between the recommended hook size and the actual hook size you need to use.
In some situations, you can correct a smaller stitch gauge via blocking by stretching the fabric while its wet and fixing its stretched position using pins. You’d then leave it to dry in this position and, once it’s dry, you’d remove the pins and measure your gauge again.
If your gauge is larger widthwise, go down in hook size.
For example, if you used a US G-6/4.0 mm hook and your gauge came out to 12 stitches (instead of 16), that means that your stitches are too wide. The 4-inch (10.16-cm) space that the pattern assumed will be occupied by 16 stitches will actually only fit 12 of your stitches. Conversely, 16 of your stitches occupy more space than needed. In this case, you should go down to a US E-4/3.5 mm or US D-3/3.25 mm hook. A larger stitch gauge cannot be reliably corrected via blocking.
Pro tip! Hook material matters when it comes to gauge. A plastic, wooden, or bamboo hook will yield tighter stitches, while a metal or aluminum hook has more glide and will yield looser stitches.
b. Adjusting your gauge lengthwise: the golden loop method
While changing the hook size is a great way to easily adjust the width of your crochet stitches, a different hook size will generally not affect the height of your rows by any significant amount. To adjust how tall your stitches are, you’ll need to understand the golden loop method.
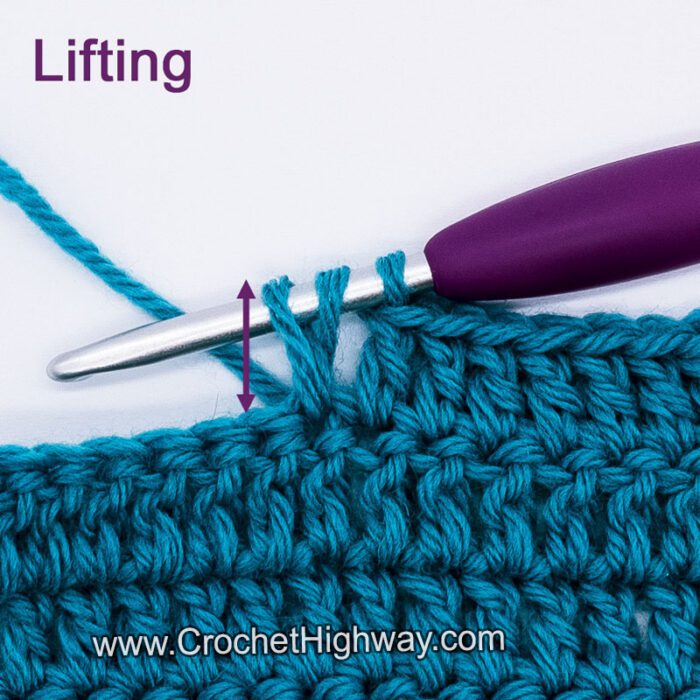
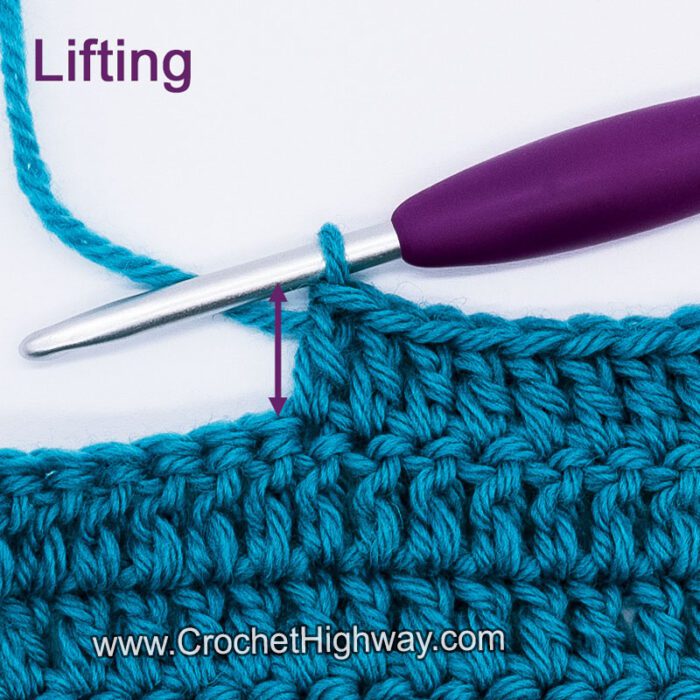
The golden loop is the first loop that you pull up when crocheting any stitch. The golden loop method involves controlling how tall the golden loop is.
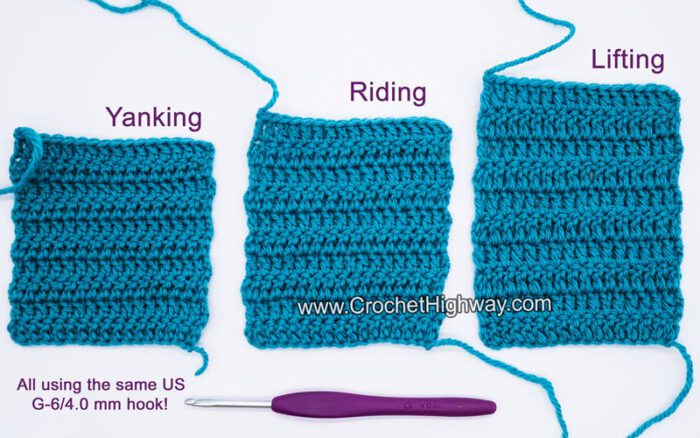
Pull it up higher than usual to make the stitch taller–this is called lifting:
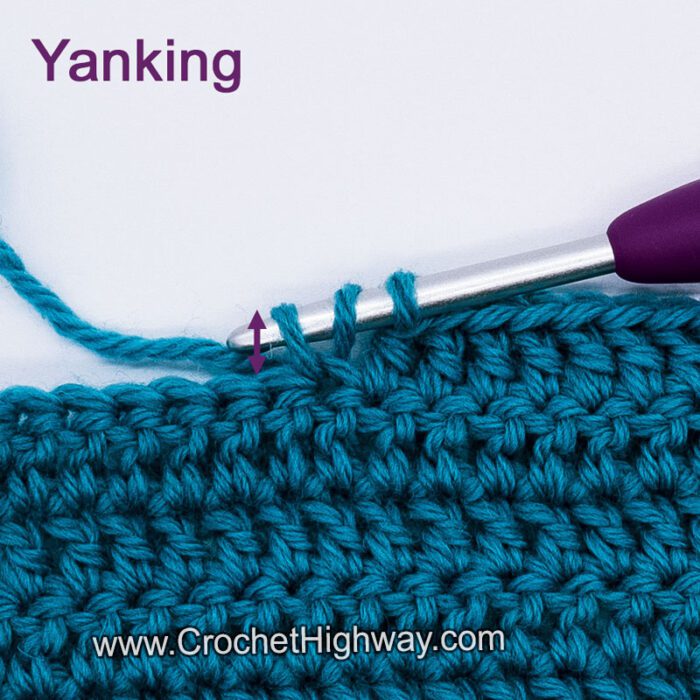
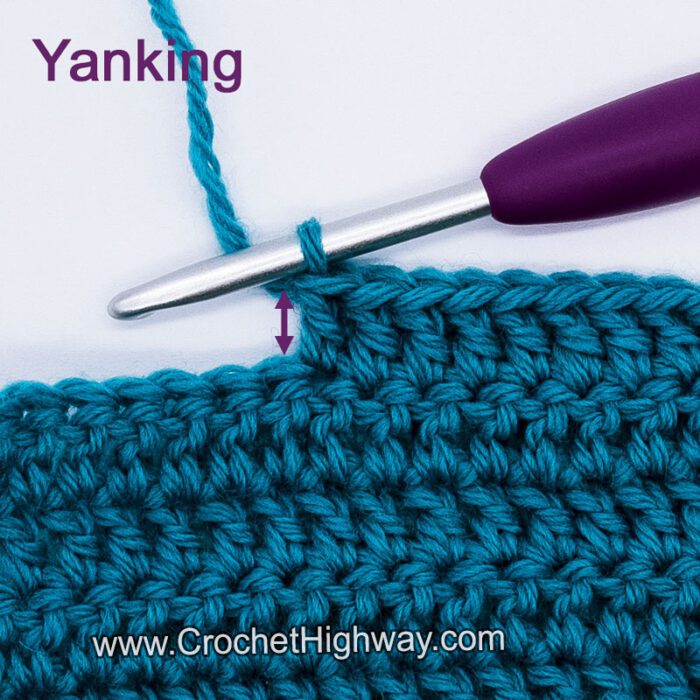
Pull it tighter to make it shorter–this is called yanking:
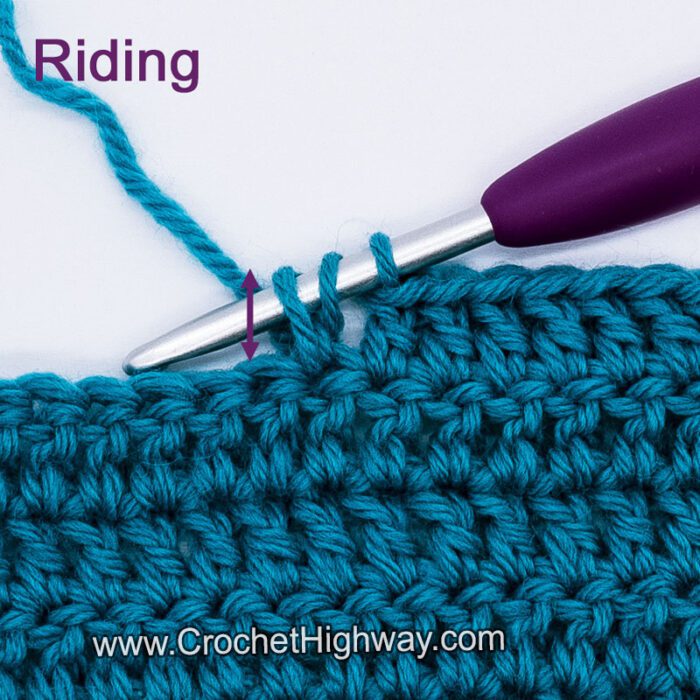
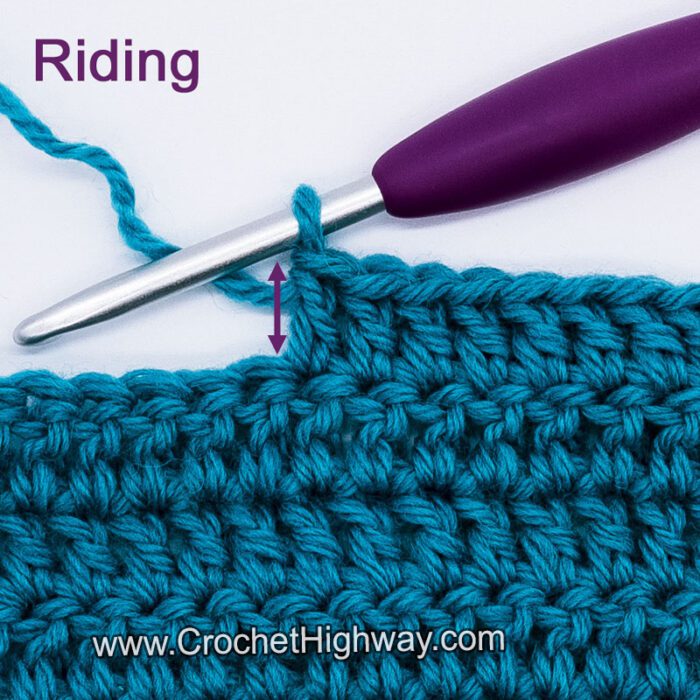
And if you pull it somewhere “in the middle”, it’s called riding:
Here are the 3 swatches side by side. The height dramatically differs depending on how I manipulated the golden loop, even though I used the same hook size, the same yarn, and I crocheted the same number of rows, and all the while the width remained the same across all three swatches. It logically follows that the tallest swatch (lifting) will also require a lot more yarn to complete, because you’re covering a larger area using the same number of stitches and rows.
In our previous example, the pattern gauge was 20 rows per 4 inches (10.16 cm), which means 10 rows per 2 inches (5.08 cm). This row gauge is achieved by the swatch in the middle (“riding”).
If your own swatch has more rows, it means that your gauge is smaller (more rows fit inside the same space) because you’re naturally yanking your golden loop and should lift it a little higher.
Conversely, if you have fewer rows, it means that your gauge is bigger (fewer rows fit inside the same space) because you’re lifting your golden loop and should yank on it a little harder as you go.

In conclusion:
If your gauge is too small lengthwise, lift your stitches more.
For example, if your gauge is 26 rows (instead of 24), that means that your rows are too short, and 24 of them occupy less space than needed. Recommendation: lift your stitches so that each stitch is ever so slightly longer (taller). In some situations, you can also correct a smaller row gauge via blocking by stretching the fabric, fixing its stretched position using pins, and blocking it.
If your gauge is too large lengthwise, yank your stitches more.
For example, if your gauge is 22 rows (instead of 24), that means that your rows are too tall, and 24 of them occupy more space than needed. Recommendation: yank your stitches so that each stitch is ever so slightly shorter. A larger row gauge cannot be corrected via blocking.
Pro tip! If you tried everything and you still can’t match gauge, it might be time to experiment with a different yarn.
9. Final thoughts
I hope these tips show how gauge swatching can set you up for success in your crochet journey. If your first swatch doesn’t give you the fabric you’re aiming for, don’t be discouraged, just keep experimenting! It’s normal to have to try out several hook sizes before you land on the right one.
Once you find the perfect result, you’ll have set yourself up for hours of relaxing, worry-free crocheting throughout your entire project. But it’s worth noting that your tension can naturally shift over time. And sometimes, even with your mood, so it’s important to stay mindful of it. Be sure to check your gauge regularly as you work in order to avoid unexpected changes halfway through your project. Gauge can shift if you take long breaks between crocheting sessions, but it can also vary within a single day! If you notice your stitches becoming tighter or looser, try adjusting your tension. And if that doesn’t do the trick, don’t hesitate to switch hook sizes mid-project.
Thirsty for more? Why not check out some of my recently published crochet patterns and tutorials:
Wow! I learned so much from this article. This is the first time I have heard of lifting, riding and yanking. It sure explains a few “odd” looking things I have crocheted. I thought all I had to do was match stitches & rows. Thank you this is so helpful. As I read it I could see myself doing certain things that made for more than once ripping rows out and starting over.