How to crochet ribbing for beginners
A short & to the point guide to applied ribbing
Disclaimer: Some links on this page are affiliate links. This means that, if you click through the links and make a purchase, I will earn a small commission at no additional cost to you.
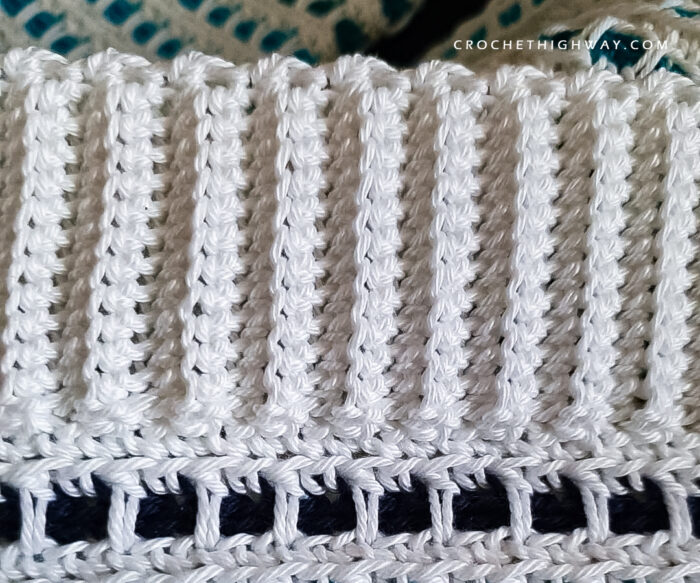
This tutorial shows you how to crochet ribbing directly onto your project. It’s the perfect technique to add ribbing onto the body of your sweater, the neckline, the sleeves, but it also works great for other stuff too, like beanies, gloves, etc. Pretty much anything you want ribbing added to!
This type of ribbing always starts with a foundation chain. After completing the last row of your project (let’s say the body of your sweater), join the row and chain any number of chains (depending on how long you want your ribbing to be), plus one extra chain.
Step by step tutorial
🧶 Step 1: Work a regular single crochet (SC) as your first stitch, and a single crochet in the back loop only (blosC) in all other stitches across. If this is your first row on the foundation chain, work a SC into the 2nd chain from your hook and into each chain across.
🧶 Step 2: When you reach the end of the ribbing row, work 1 slip stitch (SLST) into each of the next 2 stitches on the last row of the sweater.
🧶 Step 3: Chain 1 and turn CLOCKWISE.
🧶 Step 4: Work a bloSC into each stitch across, until 1 stitch remains. Work a regular SC into the last stitch.
🧶 Step 5: Chain 1 and turn COUNTERCLOCKWISE.
Repeat this process, working a regular SC in the stitch on the outer edge of the ribbing, and bloSC in all other stitches, joining via 2 SLSTs into the body of the sweater.
The result is a sturdy, stretchy ribbing that has a perfectly even edge!
Remember!
🧶 All the edge stitches are regular single crochet stitches, worked in both loops as opposed to back loop only. This will make your ribbing more durable and help it keep its straight edge for longer!
🧶 Turning COUNTERCLOCKWISE at the outer edge of your ribbing improves its durability, as the stitches are more compressed (tight) along the outer edge.
🧶 Turning CLOCKWISE at the base of your ribbing ensures you’re not going in a circle!
Check out this video tutorial I made demonstrating the process!

Thirsty for more? Why not check out some of my recently published crochet patterns and stitch tutorials: