Everything you need to know about WPI (wraps per inch), why it matters, and how to measure it
In this post you’ll learn what WPI is, how to measure it, and why it’s the most accurate method to compare yarn thicknesses.
While I tend to talk a lot about the technical stuff and nitty-gritty details in this post, it’s important we don’t forget that crochet and knitting alike are, by nature, a creative process.
I encourage you to experiment in your craft and remember that the beauty of fiber arts and handmade is that no two pieces will ever be identical!
Disclaimer: Some links on this page are affiliate links. This means that, if you click through the links and make a purchase, I may earn a small commission at no additional cost to you.
THE BASICS
1. What is WPI? WPI stands for wraps per inch, and it’s the best way to determine the true weight of your yarn. Sometimes, the standard categories of yarn weights that you can find listed on the Craft Yarn Council website (fingering, sport, DK, worsted, aran, bulky, super bulky) are not so standard at all. I’ve seen yarns advertised as sport weight in some places, but the same yarn is labeled as DK in others. One yarn label says the yarn is aran weight, but I’m looking at it with my own eyes and I can clearly see it’s thicker than another yarn I have, that’s labeled as bulky.
2. Why is WPI important? It’s the most accurate way to measure the thickness of yarn. It comes in handy when you’re substituting yarn, that is, you’re using a yarn of a similar category, but of a different brand than the pattern calls for. Other scenarios where taking a proper WPI measurement is useful is when your yarn is missing its label.
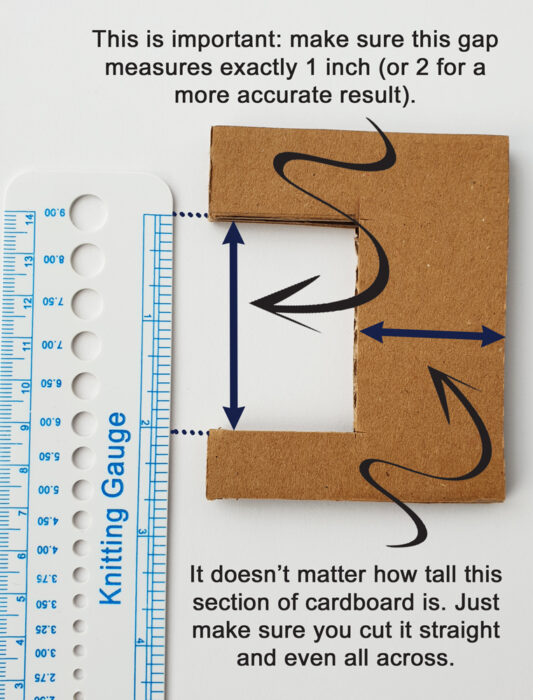
3. Okay, I get it. WPI is important. But how do I measure it? Taking a proper WPI measurement is super easy. All you need is a ruler and an object to wrap your yarn around. This can be the ruler itself, a pencil, or anything that has a consistent circumference. I like to use a piece of thick cardboard that I cut out a 2” square out of.
I also prefer taking the WPI measurement over 2 inches instead of just 1, for a more accurate result. It doesn’t matter how tall the cardboard is, just cut out exactly 1 inch (or 2 if you want to be more precise) to mark where you need to start and stop wrapping, and make sure this surface is straight and even.
There are also a bunch of ready-made tools you can buy for measuring WPI, such as this one, or this cute alpaca one available on Amazon. But you know I love to bring you fun DIY ideas to try with stuff you already have around the house!
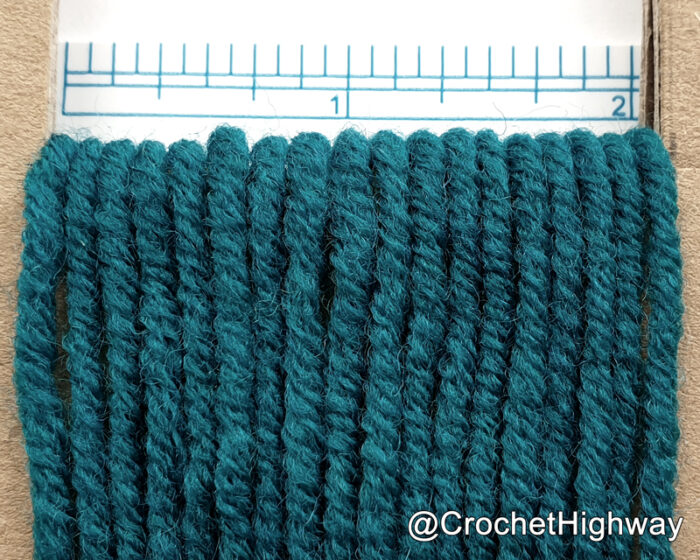
Start by wrapping your yarn around the pencil or cardboard tool. The yarn should be taut, with the wraps sitting comfortably side by side with no overlaps or large empty spaces between the strands. Don’t pull the yarn too tightly – the tension shouldn’t change the natural thickness of the strand. It must remain as close as possible to its “relaxed” state.
Practice this technique using a yarn that you know the weight of. Once you finished wrapping, count how many strands fit into a 1-inch segment. If you’re taking the measurement over 2 inches, simply divide your result by 2 to get the final WPI.
I have worked with yarns that have more yardage per 50 g and were thicker than others with fewer yards per same number of grams.
EXPERIMENTING
I wanted to see how a different WPI value can change the overall look and feel of my Cosmopolitan Sweater, so I decided to crochet a second sweater using a different yarn, which is ever so slightly thicker and has a low-loft fiber structure (meaning it contains more fiber than air, making it denser). As you will see, this small difference really adds up. Also worth mentioning is that I went up in size for my second sample, as I’m in between sizes and wanted to see the difference in fit. The Alize, my substitution yarn, is also a different fiber blend and feels coarser to the touch, as opposed to the Schachenmayr which has a buttery, silky feel to it.
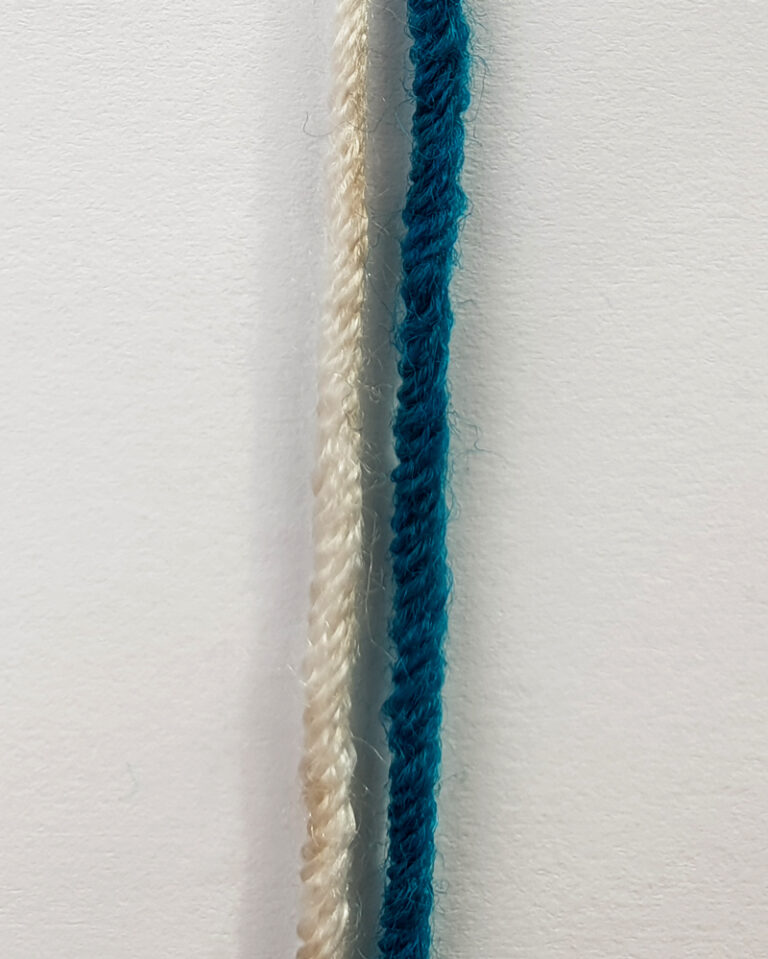
Even though the yardage per 100 g is virtually identical in both yarns, the Alize is actually a thicker yarn. This fact becomes even more obvious when you sit down and take a proper WPI measurement (9 WPI vs. 11 WPI).
To the left we have the Schachenmayr (thinner) and to the right we have the Alize (thicker)
WPI of the original yarn (WPI = 11)
WPI of the sub yarn (WPI = 9)
I found that Sample 1 (the Schachenmayr – the original yarn I designed this in) is softer, shows better drape, and is overall a thinner fabric that flows more easily and drapes like a dream. Sample 2 (the Alize) shows improved stitch definition, but has less drape, and is overall a bulkier and stiffer fabric.
Therefore, when substituting yarn, in addition to gauge swatching, I strongly recommend you also check your yarn’s WPI and make sure it’s as close to 11 WPI as possible (standard DK weight), to ensure optimal drape of the final piece.
CONCLUSION
So, now you know that the same length of yarn can weigh more or less, based on its density. In practical terms, this means that you may end up using the same number of meters (or yards) as the pattern states, but your garment may end up having a thicker/thinner fabric, depending on the actual thickness of the yarn. If you don’t have the yarn on hand though (like when you’re ordering it online for the first time), comparing the number of meters per 50 grams is still the best way to judge if your yarn is a suitable substitute.
The WPI measurement is not influenced by density however, as you’re literally measuring the thickness directly. Remember though, when going by this measurement, you may still end up with a garment that’s heavier or lighter, depending on if your yarn is more or less dense. A practical situation where this matters is when your garment starts to lose its shape and get longer with wear – crochet stitches, in particular, tend to be way more flexible vertically as opposed to horizontally.
It logically follows that, when working a bottom-up or top-down construction, the fabric will get elongated under its own weight and grow bigger with time. This will happen regardless, but if your fiber is on the heavier (i.e., denser) side, the effect will be accentuated. So, if you know your yarn is dense and heavy, you can omit some rows and make your garment shorter from the beginning!
In conclusion, WPI is the most accurate method we fiber artists have at our disposal in order to judge the thickness of our yarn. This is particularly useful when substituting yarns, or when the yarn label is missing entirely. The caveat is that you need to have the yarn on hand in order to measure the WPI, as most yarn manufacturers don’t list this measurement in their yarn information. Most CrochetHighway patterns have the WPI of the yarns included under “Materials”, so if you’re wondering if the yarn you have in your stash will make a good sub for one of my patterns, you can check and compare its WPI from the start.
I hope you learned something new today, and possibly also gained a more detailed perspective on how to choose the best yarn for your next project!
Thirsty for more? Why not check out some of my recently published crochet patterns and stitch tutorials:
1 thought on “What is WPI and how to measure it”
Shobha
I cant thank you enough for this detailed explanation of WPI. Its given me a clear perspective of how to substitute and understand yarn sizes. Like you suggest if WPI is labelled on all yarns, it would be a game changer for crafters because now we are all connected globally and have access to varieties of yarn in our own region. It becomes mind boggling to me when it comes to substituting yarn and i often go by standard sizes. and because of this my crochet is often not in correct sizes.


 of yarn")
 of yarn")

I cant thank you enough for this detailed explanation of WPI. Its given me a clear perspective of how to substitute and understand yarn sizes. Like you suggest if WPI is labelled on all yarns, it would be a game changer for crafters because now we are all connected globally and have access to varieties of yarn in our own region. It becomes mind boggling to me when it comes to substituting yarn and i often go by standard sizes. and because of this my crochet is often not in correct sizes.