Disclaimer: Some links on this page are affiliate links. This means that, if you click through the links and make a purchase, I may earn a small commission at no additional cost to you.
Detailed PDF pattern
🖤 Step-by-step instructions and tutorial photos
🖤 Tutorial photos to guide you along the way, video tutorial for the main stitch pattern
Difficulty level
🖤 Intermediate
Size-inclusive
🖤 Pattern written for 9 sizes with instructions on customization
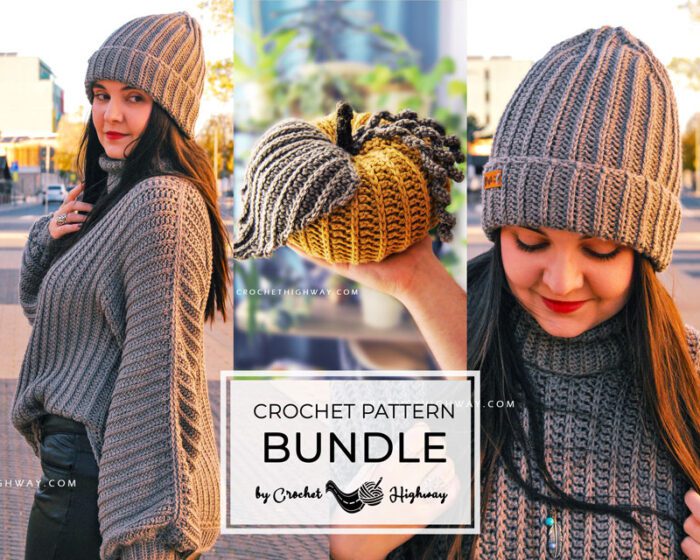
Did you know there are 3 patterns in the “No Slip Stitch Given” line? That’s right! There’s the sweater, the beanie, and the pumpkin! Save 10% when grabbing any 2 patterns on Ravelry, or all 3 on Etsy (no code needed)!
To get the bundle on Ravelry, manually add at least 2 of the 3 patterns to cart and the discount applies automatically. To purchase on Etsy, click here.
Join my Facebook support Group
I proud myself with writing ultra-detailed patterns for you, so that your crocheting experience is as smooth and seamless as possible. But whenever you have a pattern related question, my Facebook support group is the place to ask. There you can also share your WIPs and brag about your FOs with the community!
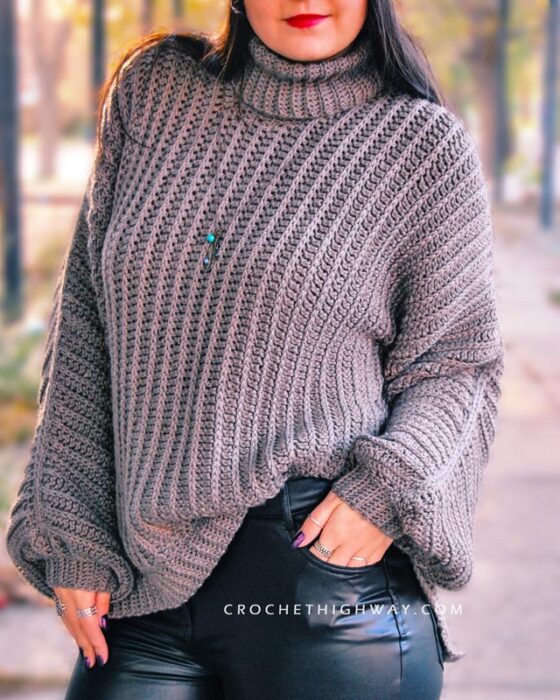
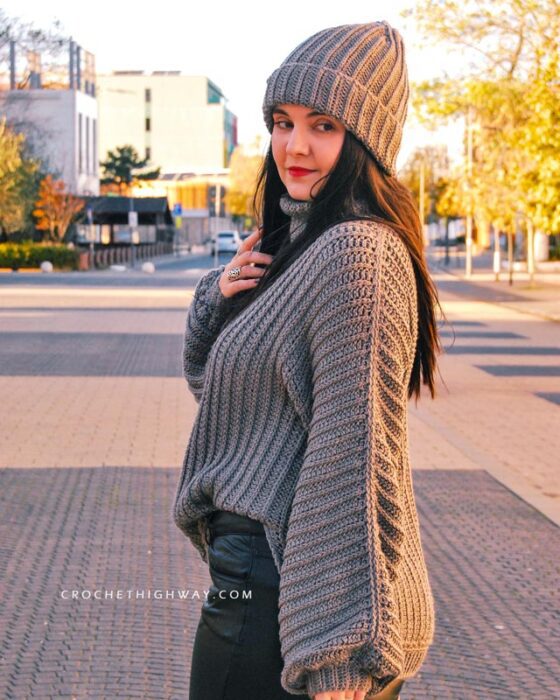
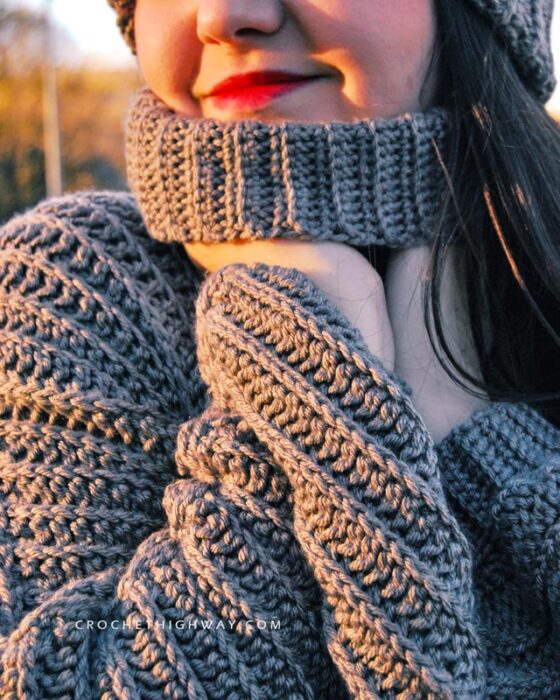
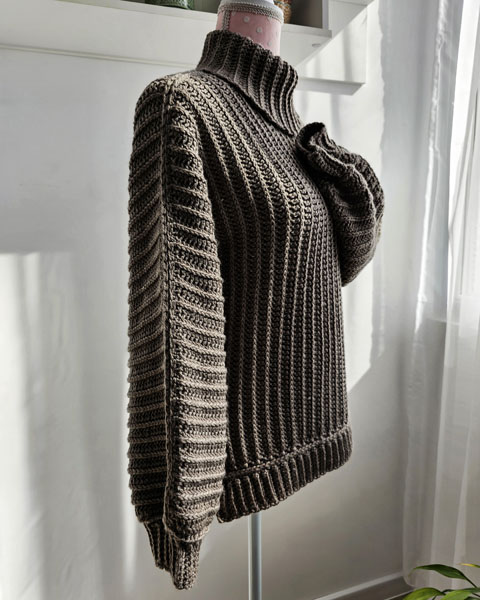
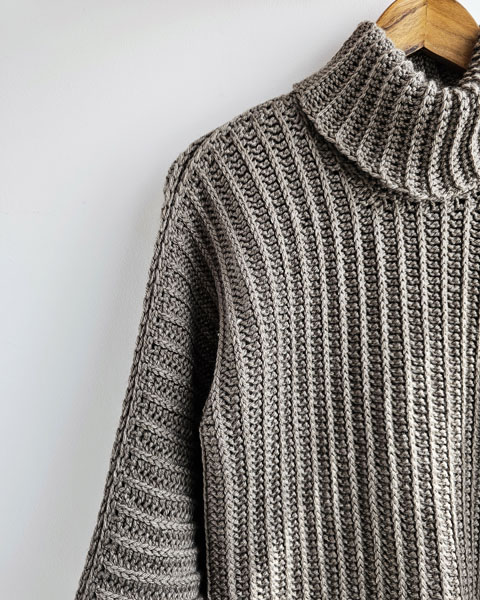
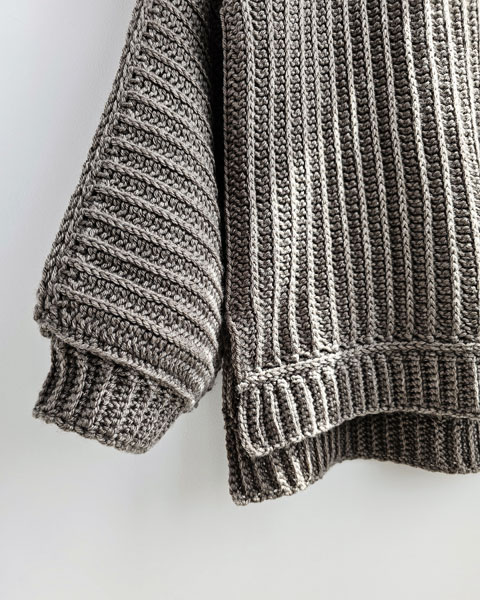
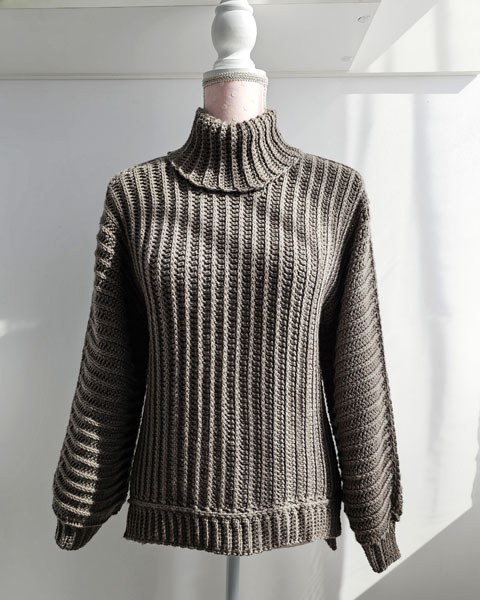
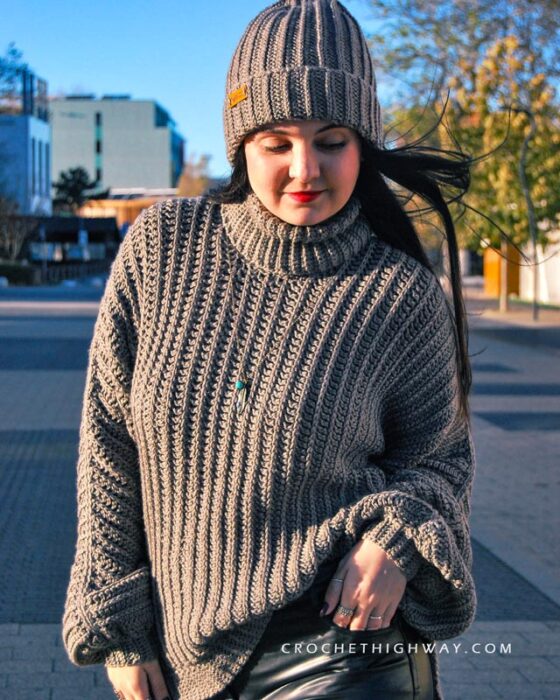
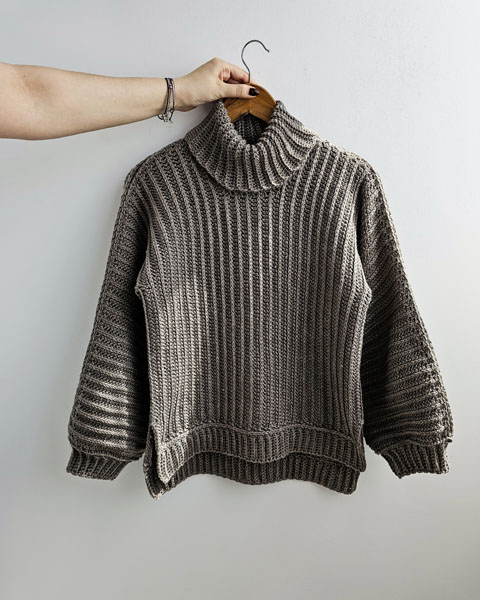
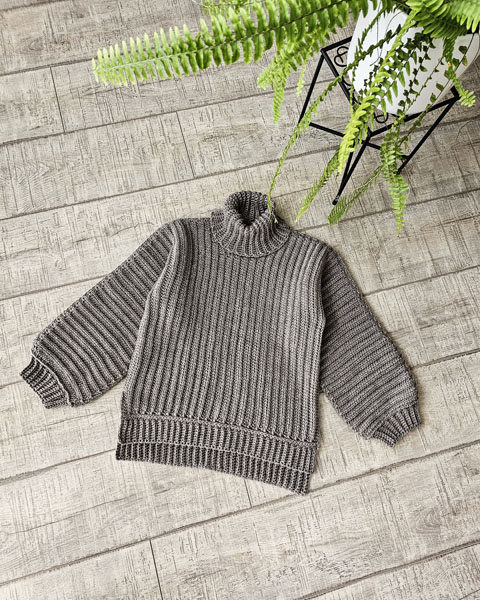
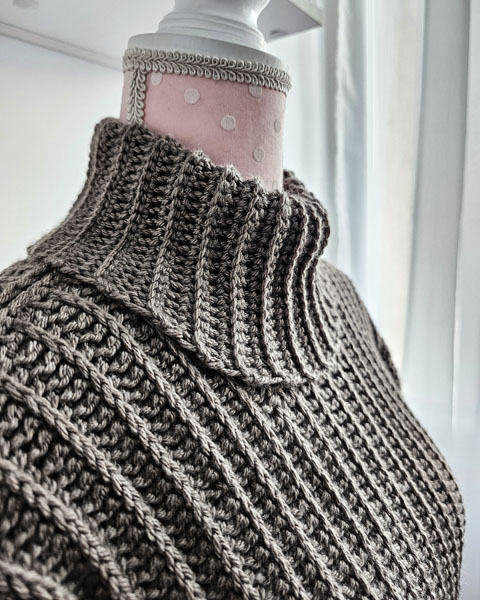
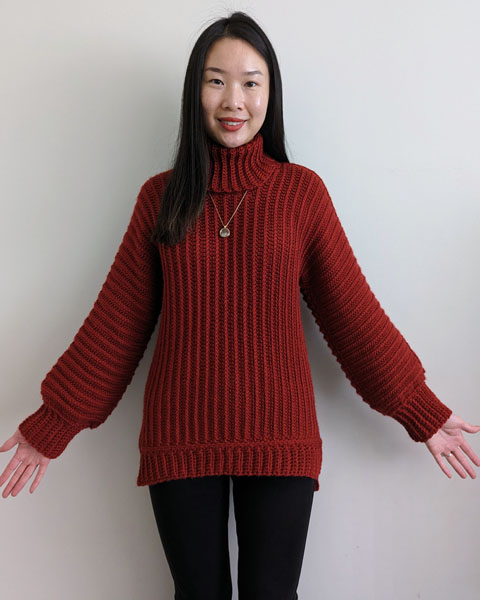
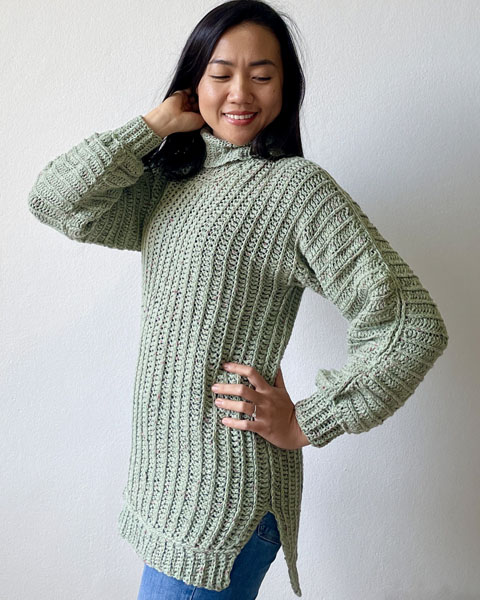
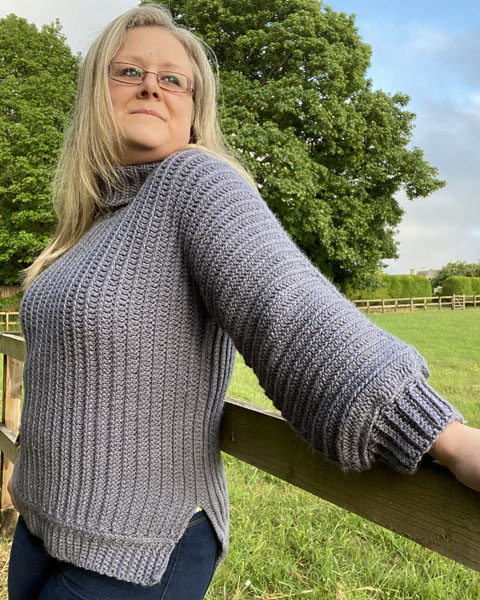
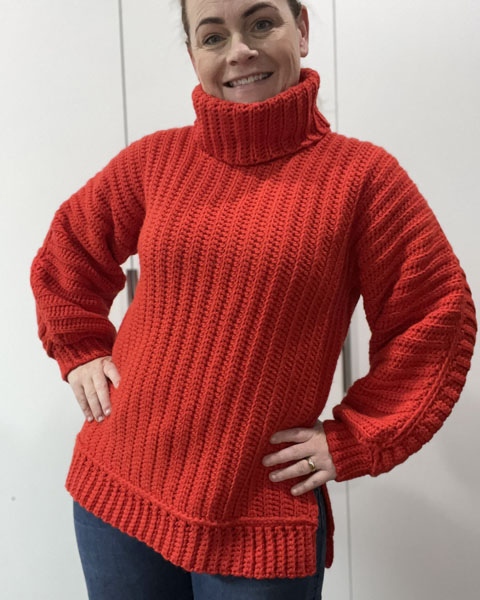
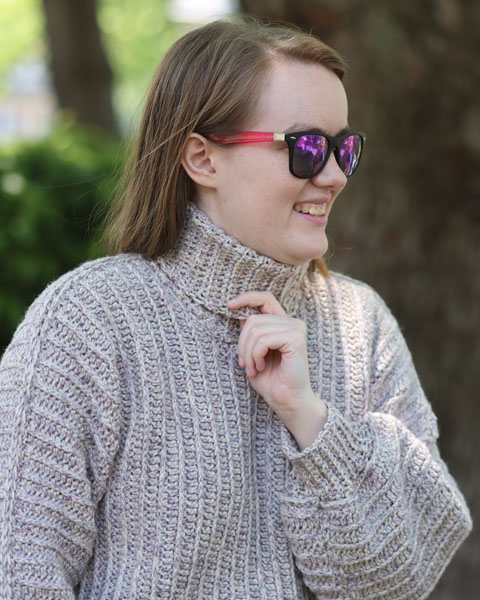
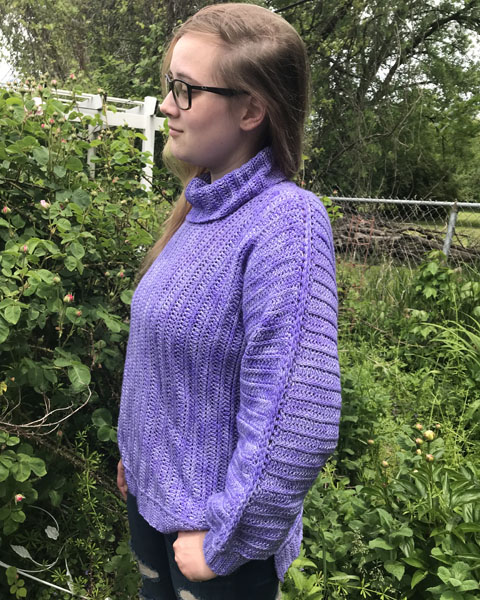
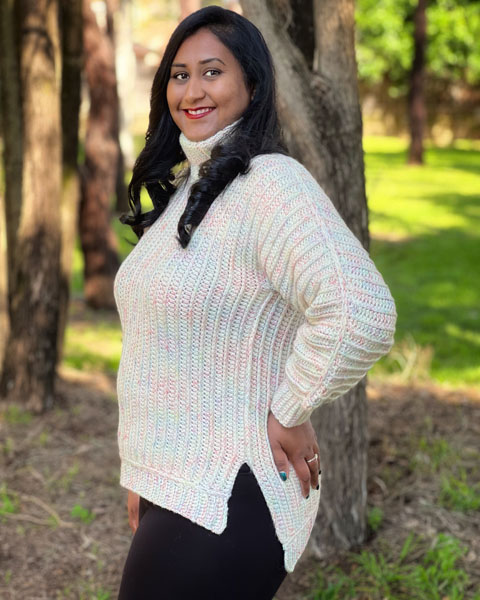
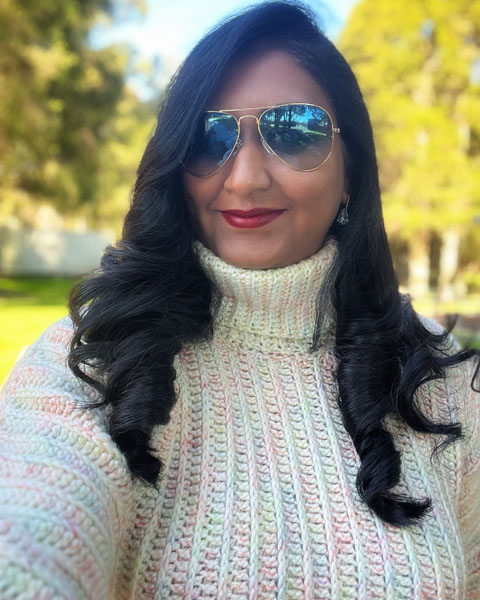
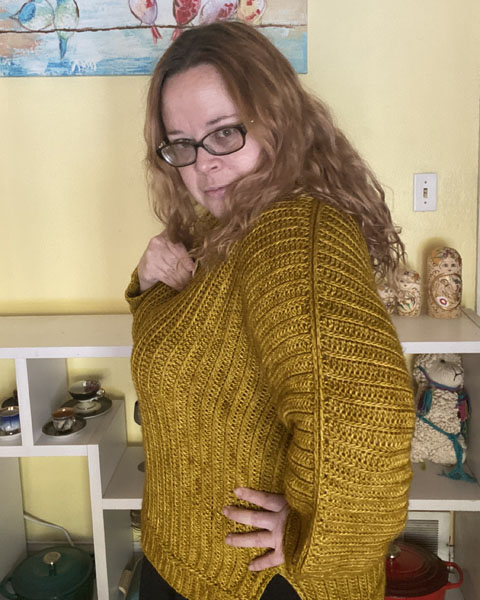
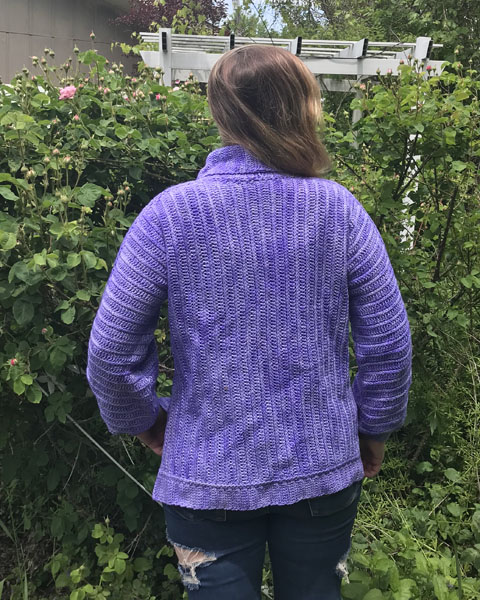
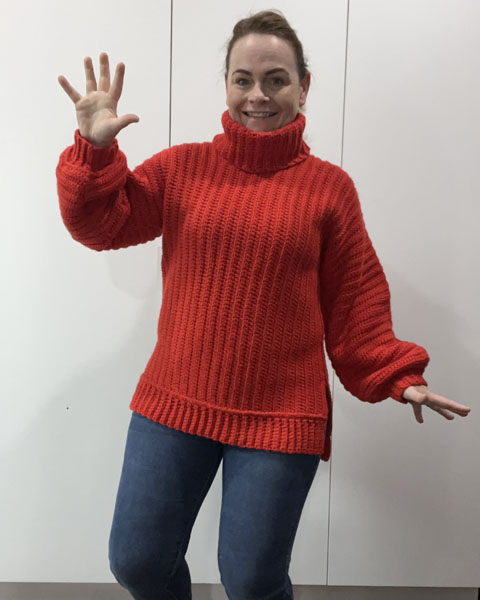
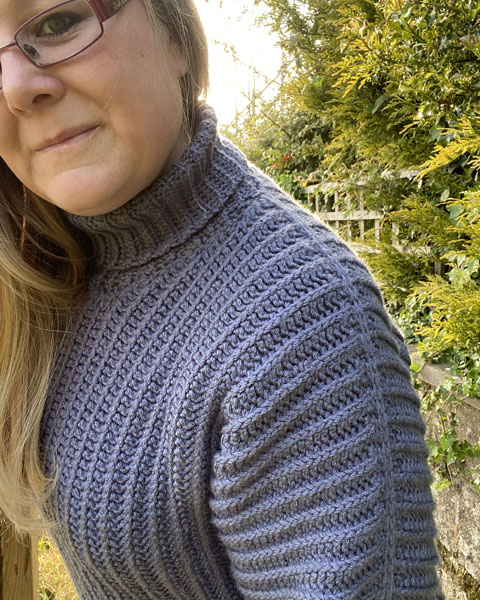
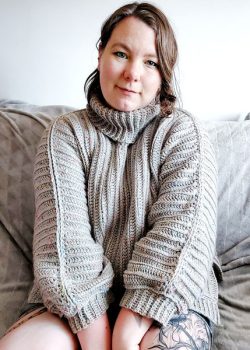
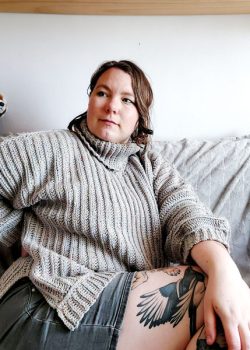
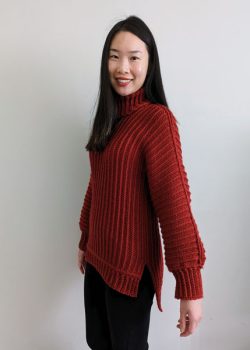
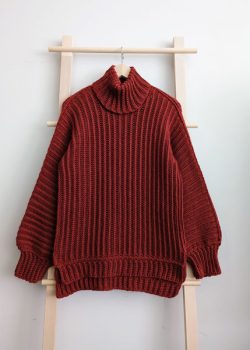
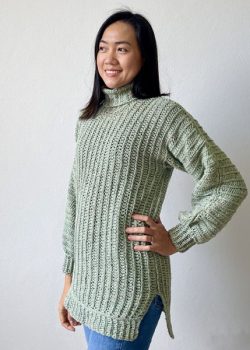
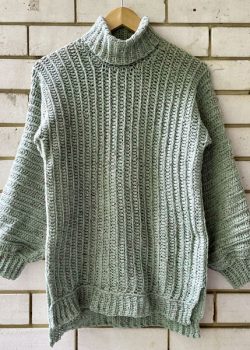
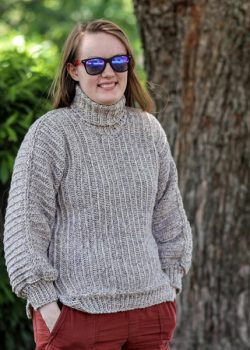
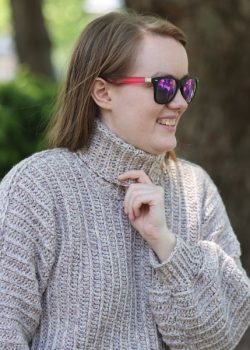
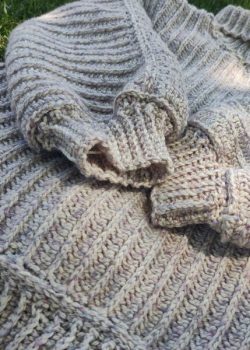
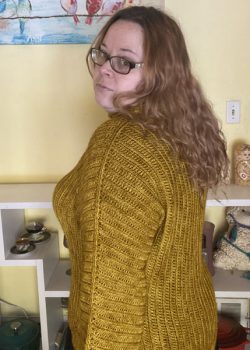
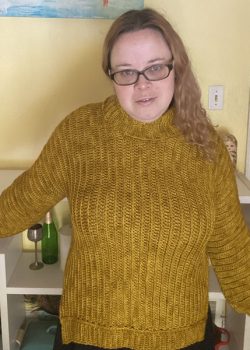
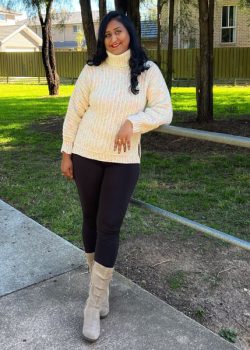
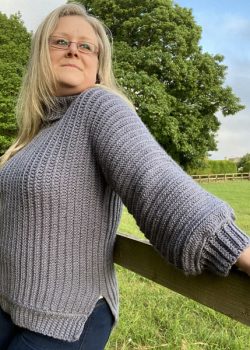
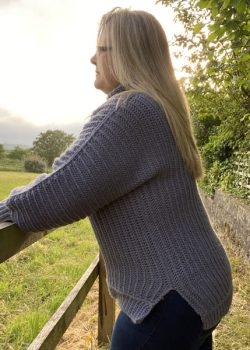
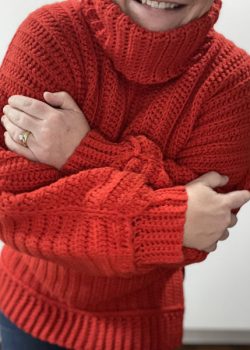
Meet your next favorite autumn sweater! The No Slip Stitch Given Sweater features a timeless knit-look texture, and the stitch pattern lives up to its name – it involves almost no slip stitch work! With a generous amount of positive ease around the bust for the ultimate cozy fit, this is the ideal garment to style down and lounge at home, or style up for a fancy night out. Featuring details such as a turtleneck, a high low hem, bubble sleeves and ribbed finishings, this sweater is comfy and cozy, like a wearable blanket yet incredibly stylish.
This pattern originally appeared in Crochet Foundry Magazine, the September 2023 issue. Grab your copy of the digital magazine here.
The construction
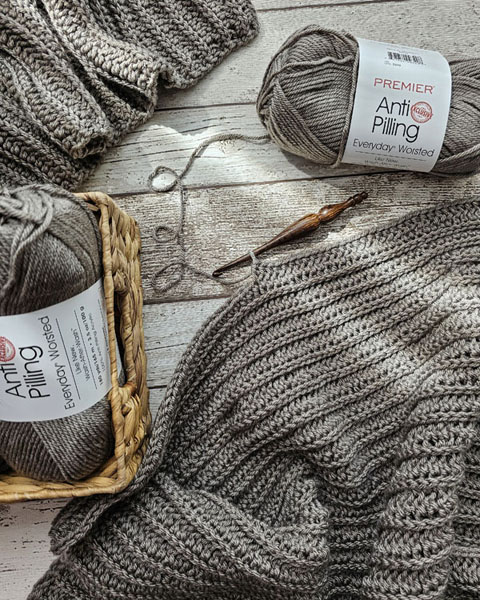
The No Slip Stitch Given Sweater uses the half double crochet in third loop only (HDC in TLO) as its main stitch pattern. This provides the gorgeous, knit-like texture and fabulous drape, but without the need to slip stitch your life away.
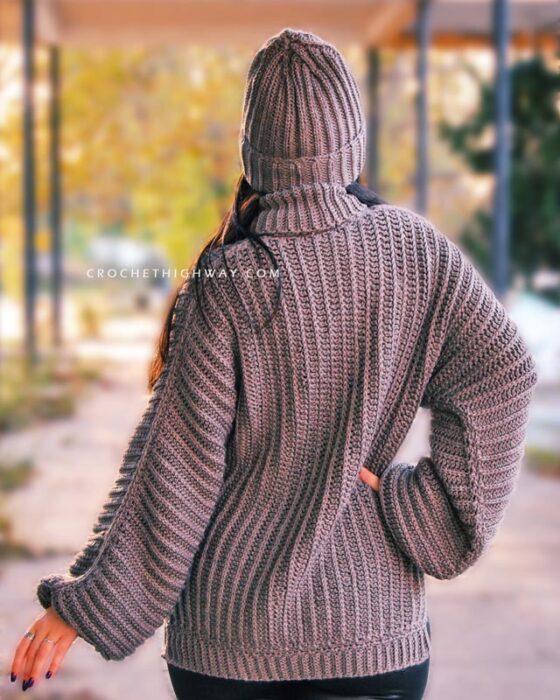
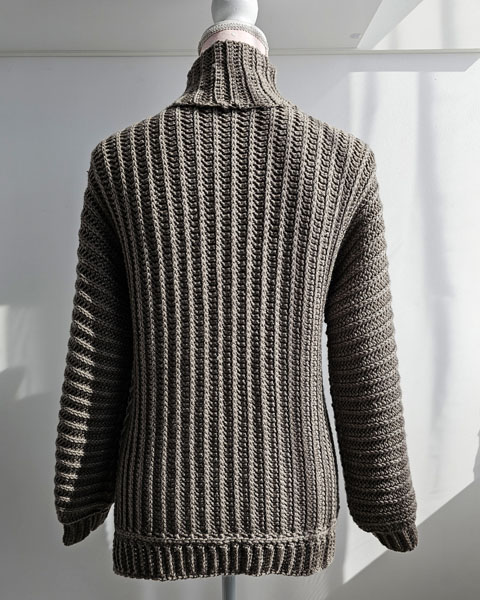
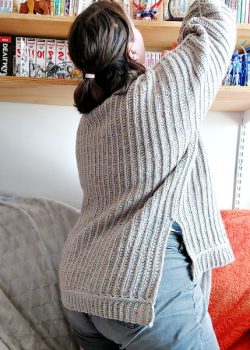
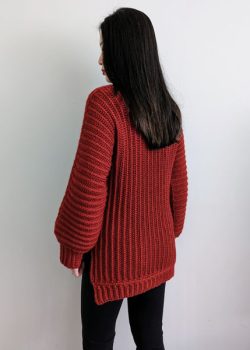
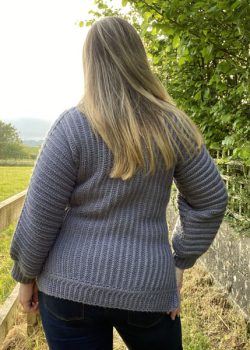
The sweater has a dolman construction worked from side to side. I chose this construction type because I didn’t want any pesky seams disrupting the flow of the texture around the shoulders. You’ll work 2 flat panels, turning your work every row. You then seam them together, and add the finishing touches: the ribbed turtleneck, hem, and cuffs.
This makes it the perfect Netflix & chill crochet project, but it also means you have to sit down for a bit at the beginning and check the finished measurements table provided in the pattern, to see if you’ll need or want any adjustments. Do you want longer sleeves? A shorter body length? A deeper yoke? These decisions are made before you start crocheting, and the pattern guides you through them in a neat section all about customizations.
The details
What makes this sweater even more special are the details. The ribbed high-low hem, the bubble sleeves, the turtleneck – they all come together to create the coziest fit. Don’t worry if you’re not a fan of turtlenecks – this element is added last, and you can easily replace it with a crew neck. The cherry on top is the decorative seam – by seaming the two dolman panels together, you’ll create a beautiful decorative seam along the upper part of the shoulders and sleeves. I first used this seam in my best-selling Cosmopolitan Sweater, which is also a variation of the dolman construction – a sub-type called the batwing sweater.
Like most CrochetHighway patterns, the No Slip Stitch Given Sweater comes with step-by-step instructions and tutorial photos.
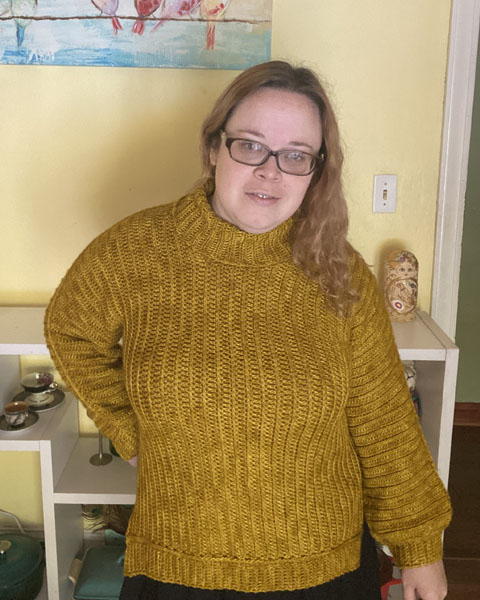
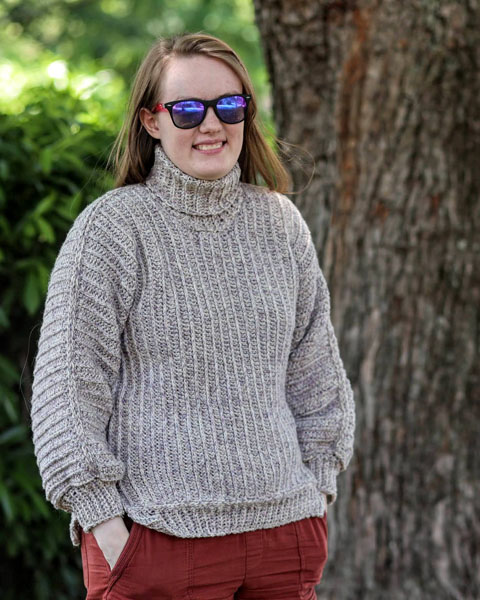
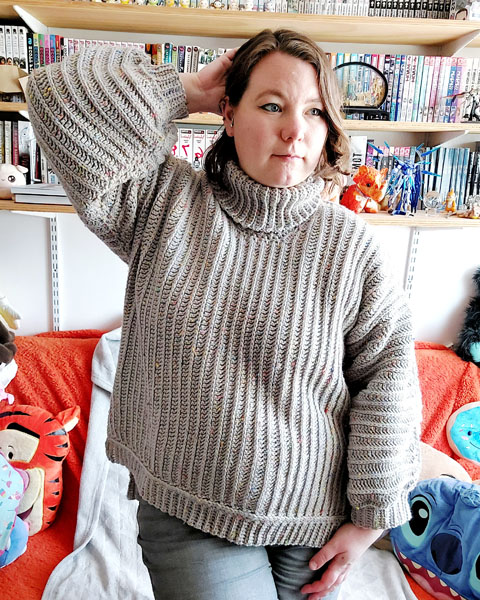
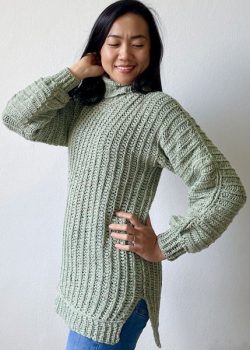
The pattern calls for worsted weight yarn, and my testers used a variety of yarns and colors to show off this design. Check out the tester photo gallery below to find all the details on yarns and yardages from my testers!
Learn more about the inspiration behind the NSG Sweater, some challenges I’ve faced designing it, and a little bit about myself in my interview published on the Crochet Foundry blog post!
The yarn is a bouncy, squishy, and soft worsted weight yarn with great stitch definition. The subtle sheen adds that extra something to the finished piece, and the acrylic ensures an easy care process for your sweater!
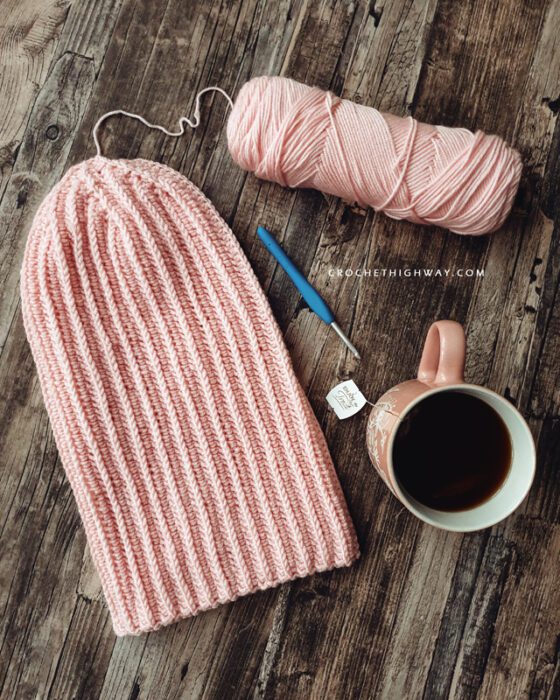
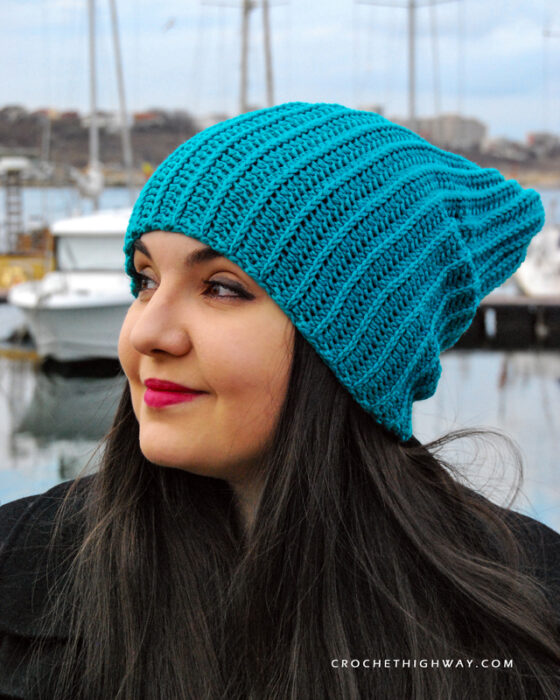
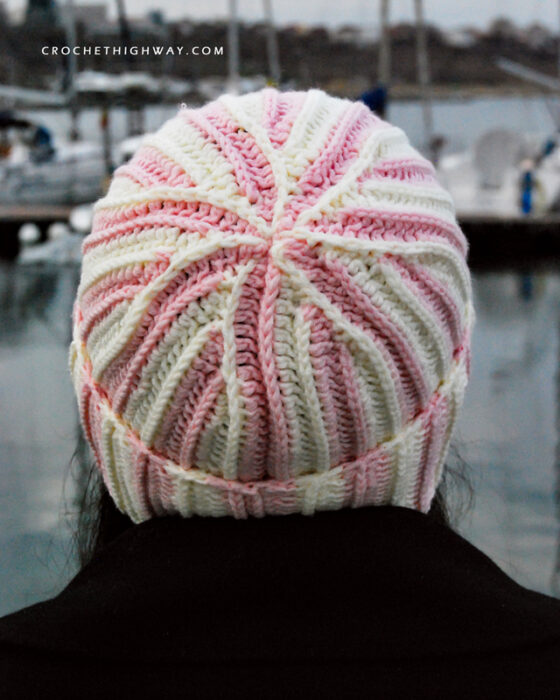
Pair your new sweater with its sister pattern, the No Slip Stitch Given Beanie! The same effortless look free of slip stitch work, in a timeless beanie design.
Scroll down for the complete tester lookbook, where you can find photos, yarn & yardage info from all my testers, as well as certain modifications they made to their sweaters for the perfect, customized fit.
Yarn: Premier Anti-Pilling Everyday Worsted colorway Dove, Worsted weight #4 yarn (100% Anti-Pilling Acrylic; 180 yds/165 m per 100 g skein, or any worsted weight yarn you can meet gauge with, in the following amounts:
Finished bust in cm: 93 (102, 114, 122, 134) (142, 154, 163, 175) cm
This sweater is designed to be worn with 4-8″ (10-20 cm) of positive ease around the bust. When choosing a size, find the bust measurement in this table that is closest to 4-8″ (10-20 cm) bigger than your actual bust measurement and make this size.
Tester lookbook
My patterns would not be so smooth without the input of my team of talented testers. Swipe left & right for more photos of your favorite versions!
Want to test my future patterns? Check out how you can become a pattern tester for CrochetHighway!
Size 5 Yardage: 1800 yds of Stylecraft Special Aran With Wool (77% Premium Acrylic, 20% Wool, 3% Viscose) Hook sizes used: 6 mm Blocking method: Steam blocking Pre-blocking gauge per 4″: 14.5 stitches and 13 rows Post-blocking gauge per 4″: 15 stitches and 10 rows Mods: I blocked a little longer just to get 1inch extra length.
Size 2 Yardage: 1468 yds of 4 Seasons Half ‘n’ half USA Style (50% Wool, 50% Acrylic) Hook sizes used: 5 mm; 6 mm Blocking method: Wet blocking. I used pins to bring the sweater to dimensions Pre-blocking gauge per 4″: 17 stitches and 11 rows Post-blocking gauge per 4″: 15 stitches and 10 rows Mods: I added an extra 4 SC to the chain for each cuff.
Size 2 Yardage: 1452 yds of West Yorkshire Spinners The Croft Aran (100% Shetland wool) Hook sizes used: 6 mm Blocking method: Wet blocking. I used pins to bring the sweater to dimensions Pre-blocking gauge per 4″: 18 stitches and 11 rows Post-blocking gauge per 4″: 15 stitches and 10 rows Mods: I added two stitches per row to the cuffs.
Size 2 Yardage: 1685 yds of Nundle Woollen Mills undyed Undyed held together with & Wooland Works Suri Silk Merino Lace (Undyed base: 100% Merino, lace weight yarn: 50% Baby Suri Alpaca, 30% Extra Fine Merino, 20% Silk) Hook sizes used: 5 mm Blocking method: Wet blocking Pre-blocking gauge per 4″: 17 stitches and 12 rows Post-blocking gauge per 4″: 15 stitches and 10 rows Mods: None.
Size 4 Yardage: 1795 yds of Deramores Studio Anti-Pilling Aran (100% Acrylic) Hook sizes used: 5 mm Blocking method: Wet blocking Pre-blocking gauge per 4″: 17 stitches and 12 rows Post-blocking gauge per 4″: 15 stitches and 10 rows Mods: The turtleneck was a bit too tight, so I omitted the 3 slip-stitches at the base and worked a little looser.
Size 2 Yardage: 1365 yds of 4 Seasons USA Spot Saver (Acrylic) Hook sizes used: 5 mm for body, 6 mm for sl st edging, 5.5 mm for turtleneck Blocking method: Wet blocking and steam blocking. Because it’s acrylic, I wet blocked and then killed it with steam to soften it. Pre-blocking gauge per 4″: 17 stitches and 12 rows Post-blocking gauge per 4″: 15 stitches and 10 rows Mods: No mods, but I did notice the turtleneck was very tight so I sized up to 5.5 mm and relaxed my tension and only worked into 2 sl st, and it was fine. The cuffs were also quite wide, so I followed 5 and 1 decrease in the first to sl st row with a 6 mm hook, then used my 5 mm and quite tight tension to finish the cuffs.
Size 3 Yardage: 1449 yds of Malabrigo Worsted (Merino wool) Hook sizes used: 6 mm Blocking method: Wet blocking Pre-blocking gauge per 4″: 17 stitches and 11 rows Post-blocking gauge per 4″: 15 stitches and 10 rows Mods: I didn’t do decreases for the neck ribbing. I did nine less rows for the cuffs. I also did 12 stitches instead of 8 for the cuff.
I’d LOVE to see your work, so be sure to shout out to me @CrochetHighway on Instagram and use the #CrochetHighway hashtag for a chance to be featured on my stories!
Thirsty for more? Why not check out some of my recently published crochet patterns and stitch tutorials: